What To Expect
This guide should include:
- Create the Pipeline
- Bake armoryspinnaker Stage
- Find the Baked armoryspinnaker Image
- Bake with Custom Config
- Deploy the armoryspinnaker Image with Custom Config
- Add more confidence
- Verify with a Manual Run
The installer scripts setup an initial Spinnaker environment. To keep Spinnaker up to date and to release changes to configuration, we’ll teach Spinnaker how to redeploy itself. We call this the “Spinnaker deploy Spinnaker” pipeline.
This is a step by step guide to creating the pipeline.
Once the pipeline is fully configured it should look like this:

Create the Pipeline
Create a pipeline and attach it to Jenkins so that it runs automatically whenever config changes are made.
- Go into the armoryspinnaker application and create a new pipeline called “Deploy Production”
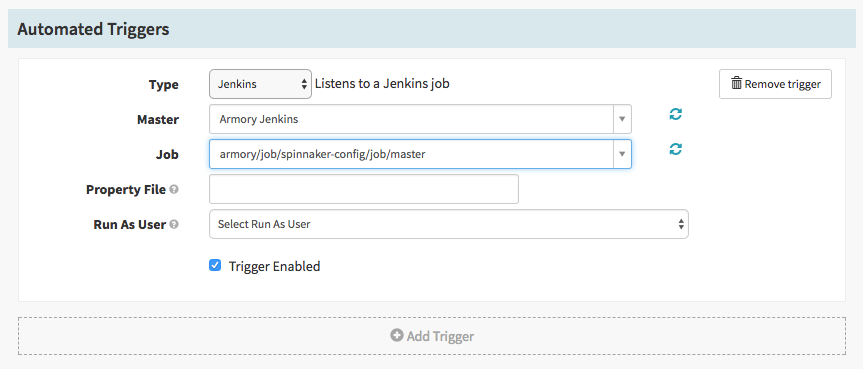
- In the configuration click on Add Trigger
- Set the Type to
Jenkins - Set the Master to the Jenkins machine that builds your configuration package
- Set the Type to
Once configured the trigger should look like this:
Bake armoryspinnaker Stage
Steps to create an AMI that pulls in the Armory package:
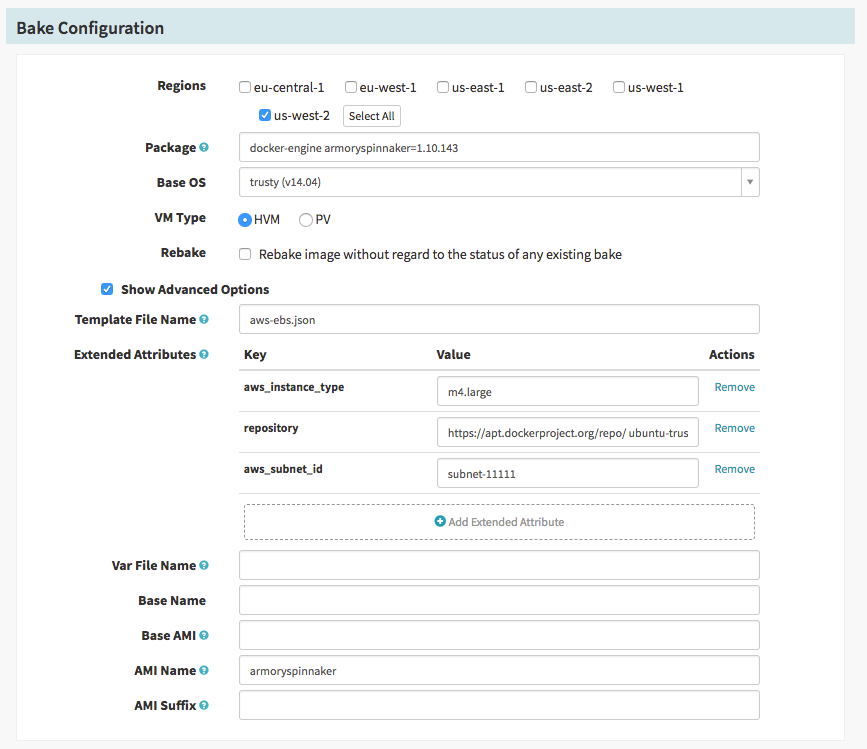
- Add a Bake stage and set the Stage Name to
Bake Armory Spinnaker - Make sure to check the
regionwhere your Armory Spinnaker instance runs - Set the Package select a version of Armory
docker-engine armoryspinnaker=SELECT_A_VERSION - Set the Base OS to
trusty (v14.04) - Check the Show Advanced Options box to see additional fields
- Set the Template File Name to
aws-ebs.json - Click Add Extended Attribute to create a new attribute
- Set
aws_instance_typetom4.large - Set
repositorytohttps://apt.dockerproject.org/repo/ ubuntu-trusty main; https://dl.bintray.com/armory/debians trusty main; - (optional) If AWS doesn’t add new instances to a subnet, set
aws_subnet_idtosubnet-11111.
- Set
- Set
AMI Nametoarmoryspinnaker
Once configured the stage should look like this:
Find the Baked armoryspinnaker Image
In this stage we’ll look up the AMI id for the image we just baked so we can feed it into the next stage.
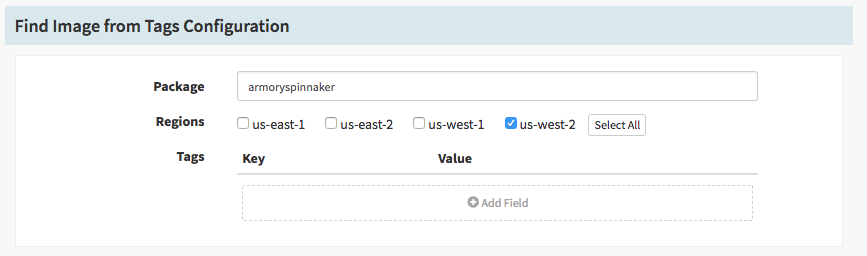
- Add a “Find Image from Tags” stage and set the Stage Name to
Find armoryspinnaker - Set the Package field to
armoryspinnaker. - Check the region that matches where your Spinnaker instance runs
Once configured the stage should look like this:
Bake with Custom Config
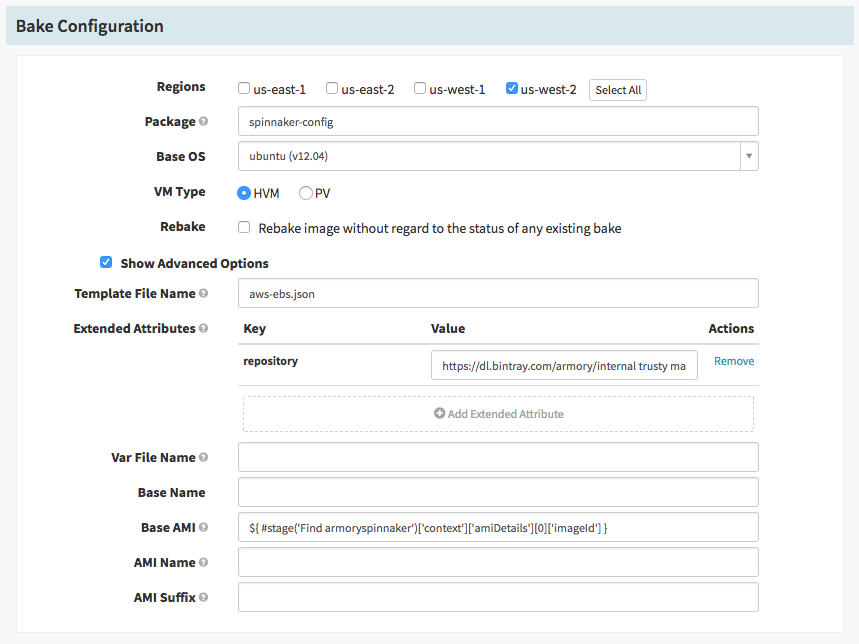
In this stage we’ll create another AMI, this time including any site specific config. By doing a 2 part bake, configuration changes is a bit quicker.
- Add a Bake stage and set the Stage Name to
Bake config - Check the region where your Spinnaker instance runs
- Set the Package field to the name of your configuration package, default:
spinnaker-config. - Check the Show Advanced Options box
- Set the Template File Name to
aws-ebs.json - Click Add Extended Attribute
- Set key to
repository - Set the value to the repository that houses your config (ie
https://apt.company.com/repo/ ubuntu main)
- Set key to
- Set the Base AMI field to the pipeline expression
${#stage('Find armoryspinnaker')['context']['amiDetails'][0]['imageId']}
Once configured the stage should look like this:
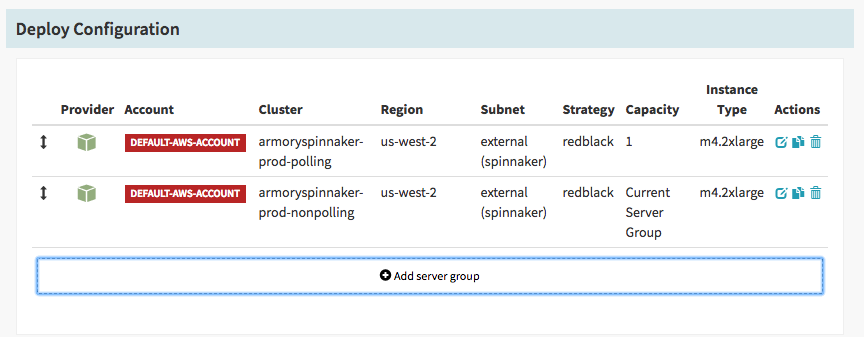
Deploy the armoryspinnaker Image with Custom Config
In this stage we’ll take the image, which now contains both armoryspinnaker and any custom config, and deploy it to the server groups necessary to have Spinnaker replace itself.
- Add a Deploy stage and name it
Deploy Production - Click Add server group and add an AWS deployment using the armoryspinnaker-prod-polling template
- Set the Strategy to
Red/Black - Turn on the Scale down replace server groups to zero instances option
- Keep a maximum of 3 server groups
- Make sure the Capacity is set to “Copy the capacity from the current server group”
- Save the server group details
- Set the Strategy to
- Click Add server group and add an AWS deployment, but using the armory-prod-nonpolling group as a template
- Make the same set of changes (strategy, scale down, keep 3 groups, and copy capacity)
Once the stage is configured it should look like this:
Add more confidence
To add more confidence to your upgrade path consider creating a stage environment and integration tests.
Verify with a Manual Run
To make sure that everything is working well you can manually run the pipeline. If all goes well the execution should show green for all stages. And you should be able to see multiple server groups in the custer view for the armoryspinnaker application. It should look something like the following:
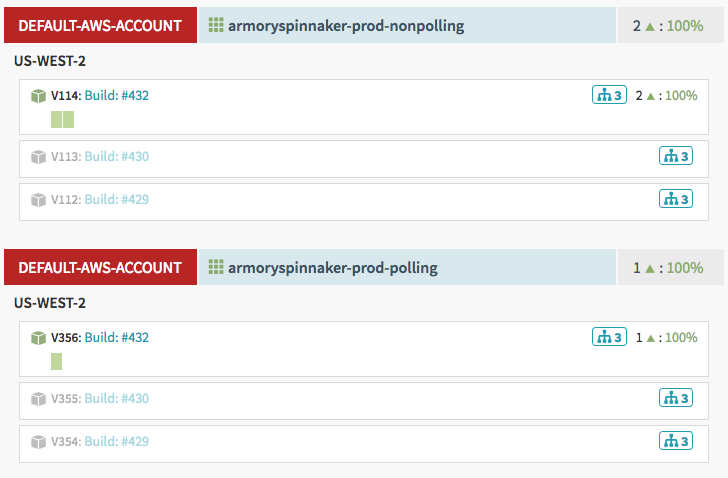
Check to make sure that:
- all the instances are green for both polling and nonpolling groups
- that only the most recent group for each cluster has instances in it
- that the polling group always has only one active instance per group
If all those things are true, congratulations! You have a Spinnaker cluster that’s capable of redeploying itself.