This guide includes:
- Prerequisites and Assumptions:
- Example
- Common errors and troubleshooting
- Deployment strategies
- What does disabled mean?
- UserData
- Passing environment data to your deployed instances
- Rolling back
- Additional Launch Block Devices
- VPC Subnet Type
Prerequisites and Assumptions:
- You are deploying to Amazon Web Services (AWS)
- You know how to create pipelines and utilize the Bake stage
- You understand Spinnaker’s naming conventions
- You are familiar with ELB configuration
- You have already created a security group to use in your application
The primary objective of Spinnaker is to deploy your software. It would like you to Bake an image and use that same image to deploy to all of your environments.
The typical type of distributed application that Spinnaker deploys is one with a cluster of homogeneous instances behind a load balancer. The load balancer is responsible for detecting healthy and unhealthy instances.
To start off, let’s go through an example. This example continues from the example in the Baking an image guide.
Example
Creating a Load Balancer
In this example we are going to deploy a simple web server that serves a page with details about its environment.
Go to the application screen to create a load balancer. Select the ‘Load Balancers’ tab:

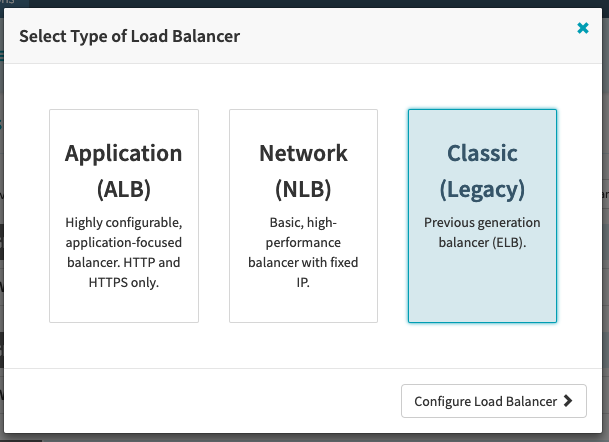
Press the ‘+’ on the right to create a new load balancer, you may need to select AWS > then select a Load Balance Type.
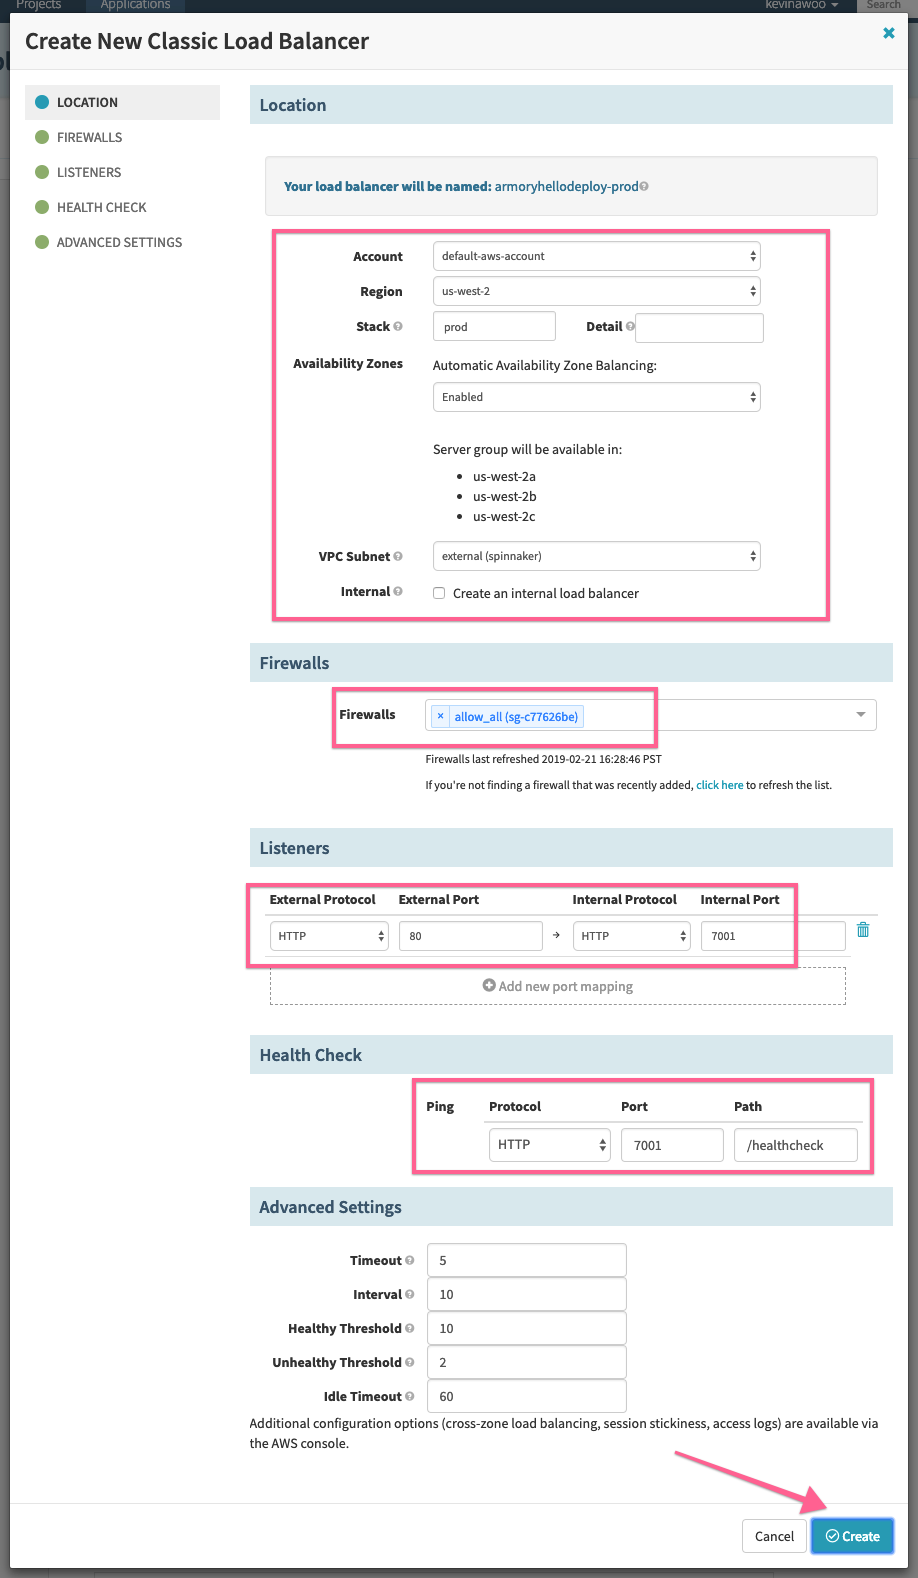
We’ll enter ‘prod’ into the ‘Stack’ field because our environment contains dev, stage, and prod.
Set the VPC Subnet Type, which maps to our pre-created security group, set the correct forwarding ports and most importantly set the healthcheck.
Now we can hit create.
Creating a Deploy Pipeline
Navigate to the configuration screen of the previously created pipeline from the Baking guide.
Select Add Stage and select Deploy from the Type dropdown.
Select Add server group option in the ‘Deploy Configuration’
Select AWS option for the provider.
We’ll be shown the option to copy a configuration from a currently running server group if a server group for this application already exists. In our case, let’s select ‘None’ and continue.
.gif)
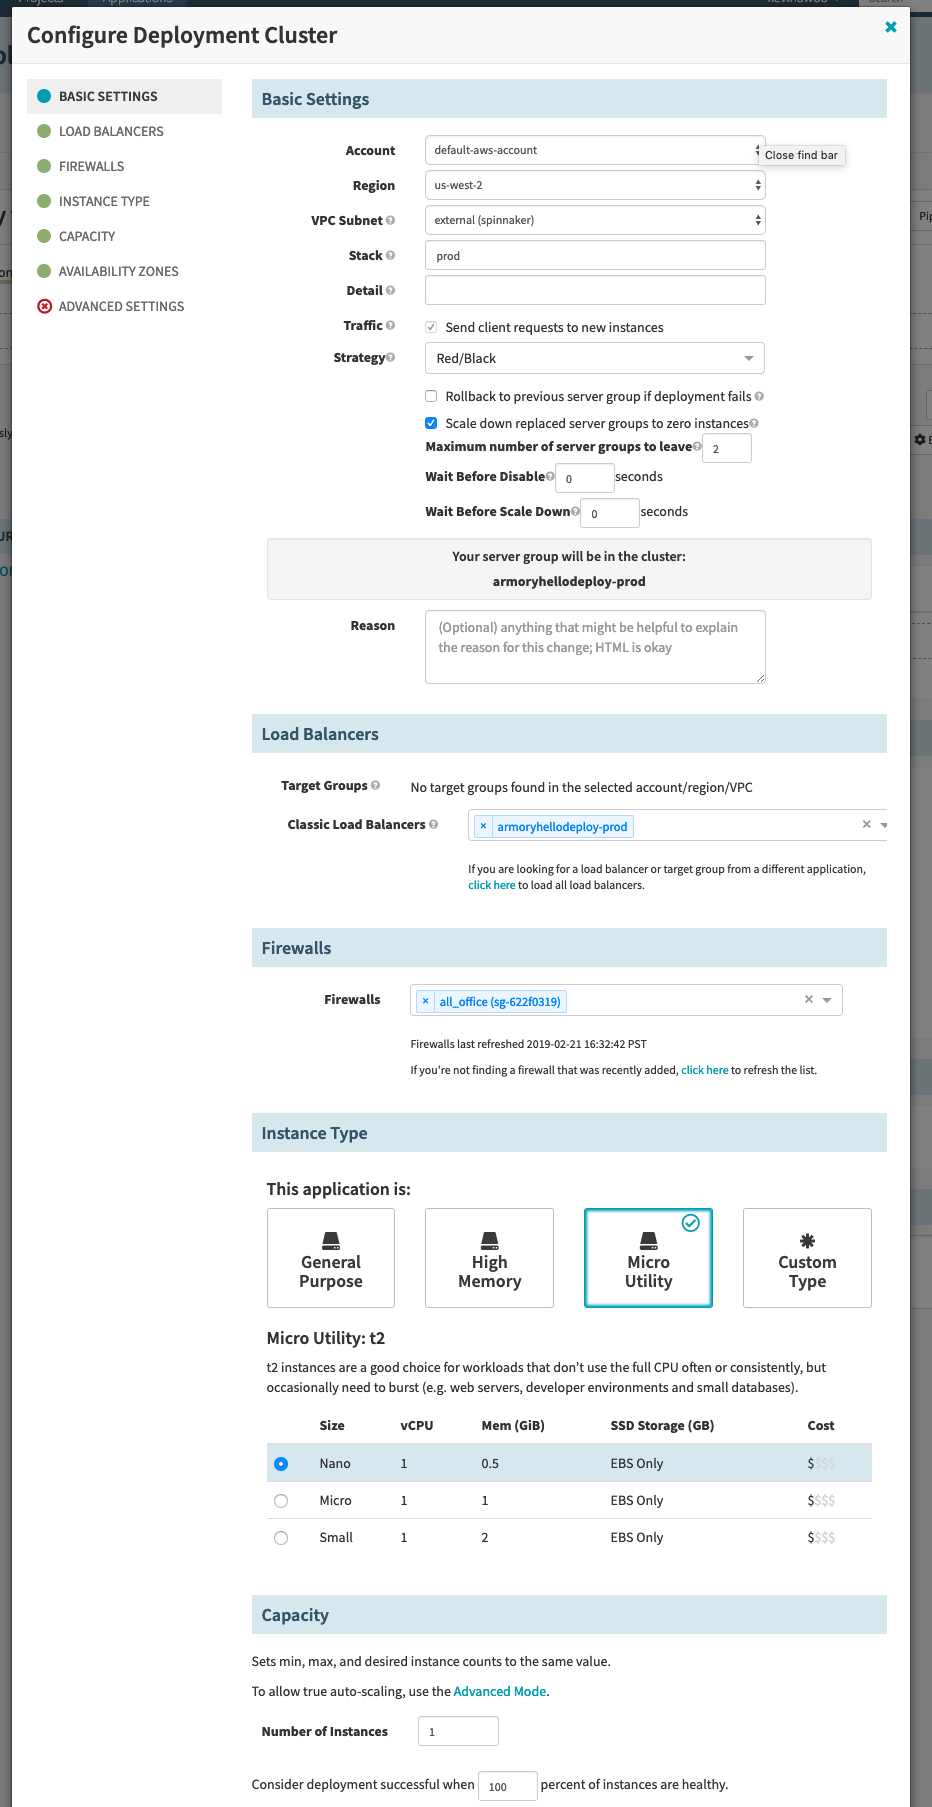
Let’s select the same VPC Subnet type as the ELB we just made. Remember to input ‘prod’ to the Stack field since that is what was used when creating the ELB.
For this example, we’ll use a Red/Black (also known as Blue/Green) deployment strategy. Leave 3 maximum server groups alive for normal services allows you to manually rollback in case of emergency easily.
Scroll down and select the load balancer that was just created from the list and select the pre-configured security group.
Note, the Firewall in this case will be for the EC2 instances.
Under the Instance Type section, select ‘Micro Utility’.
We’ll set the capacity at 1 for now, but we can later set it up to do auto-scaling.
Scroll all the way down to the Advanced Settings section and change the Health Check Type from ‘EC2’ to ‘ELB’, we’ll later see green boxes for health instances, gray for EC2 healthcheck instances, or red for unhealthy instances.
Select the keypair for the EC2 instances in Key Name.
Erase the IAM Instance Profile field. In our example, we don’t need access to any other AWS resources and the field may be filled in by default depending on your configurations.
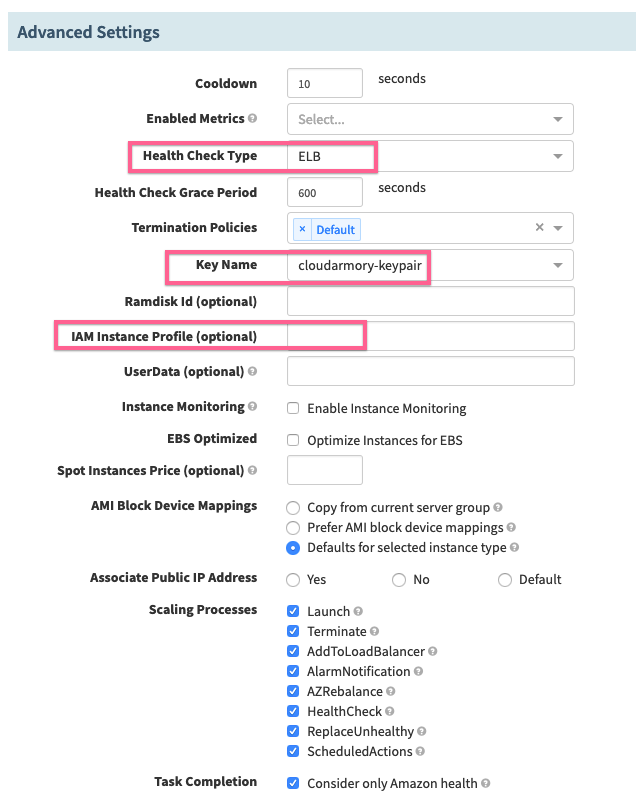
Then click Add to complete this step.
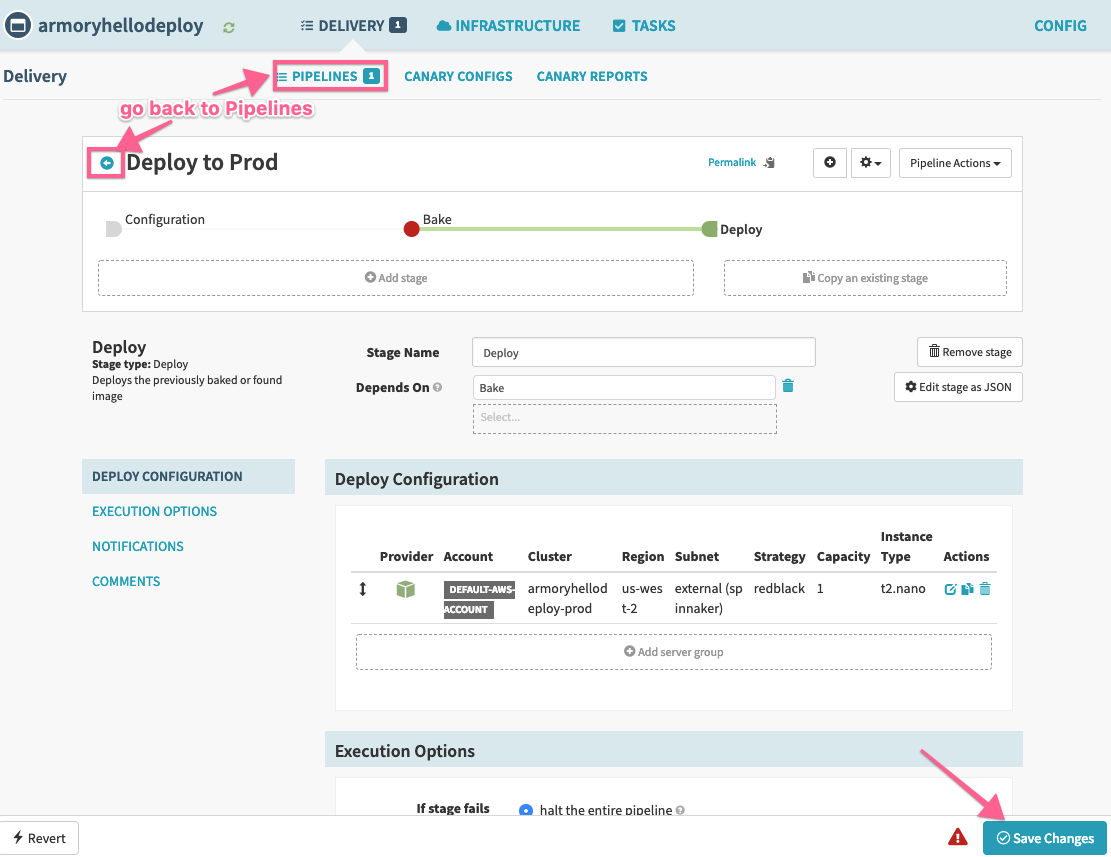
We return back to the deploy stage, with it now looking like:
Finally, we can click Save Changes and select the back arror to return to the Pipeline Executions screen.
I press ‘Start Manual Execution’ on my pipeline. This is what I see:
.gif)
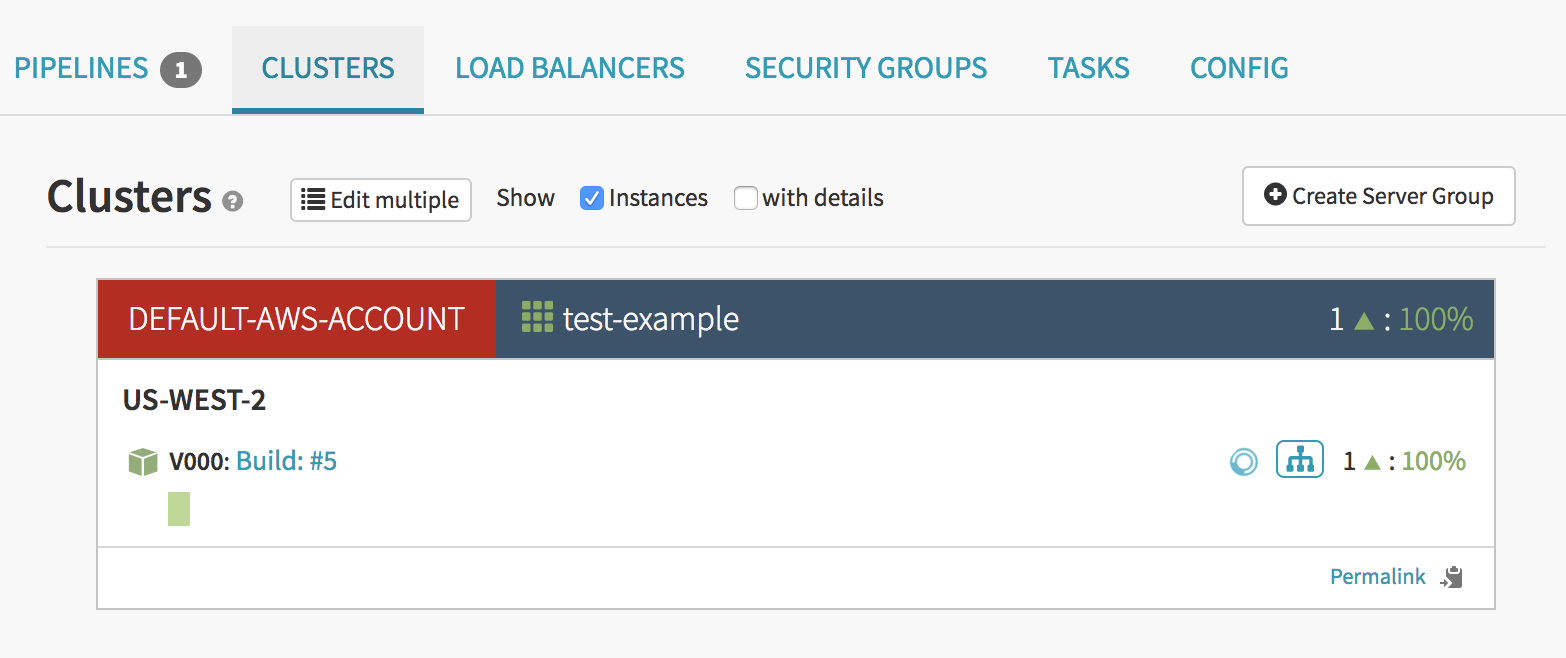
When this pipeline finishes the Bake stage, we can see it’s current stage/tasks status and we can also see it in the Clusters tab to see a new server group come up.
For more information about the details of this screen, check out the application screen description guide
I can see here that a new server has indeed come up and is healthy. Healthy in this case means that it has passed the ELB healthcheck. If you are having problems with your instances not passing the healthcheck, check out the common errors section.
Now, to demonstrate the Blue/Green, I go back to the Pipeline Executions screen and press ‘Start Manual Execution’ again. Then I go back to the ‘Clusters’ tab to watch the execution process.
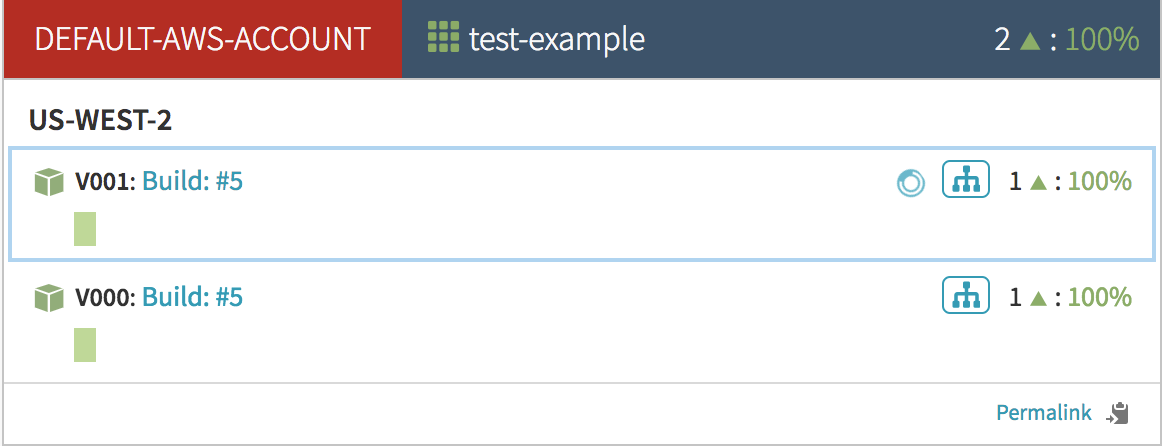
First I see that a new server group named v001 is being created. It doesn’t have any instances in it yet:
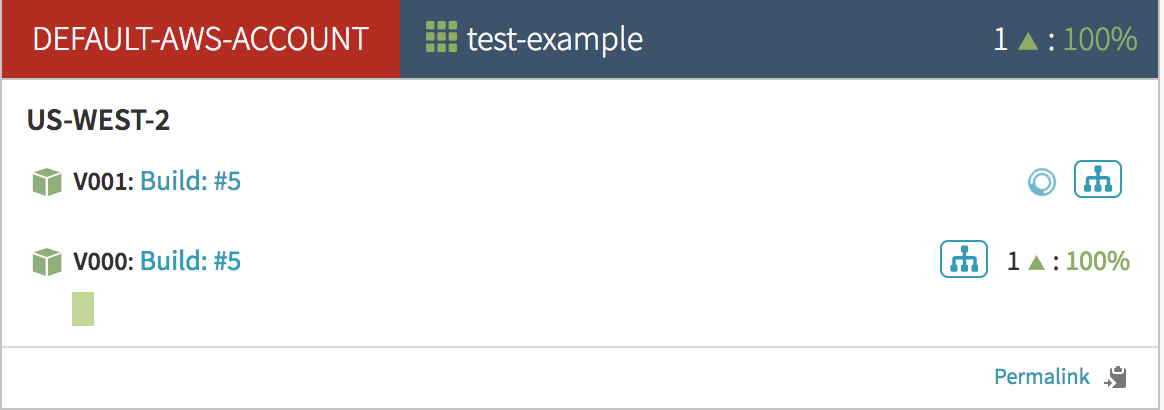
After a few moments an instance is created and is initially ‘unhealthy’:
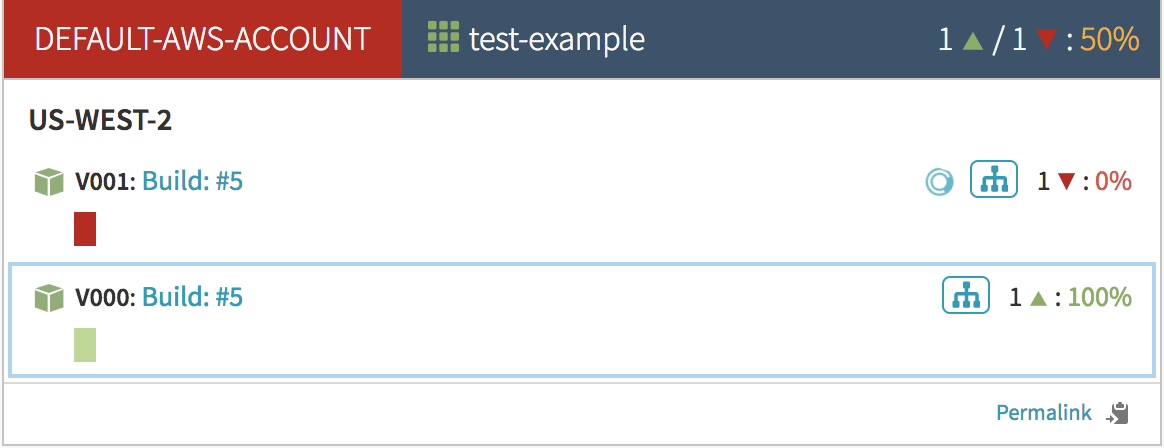
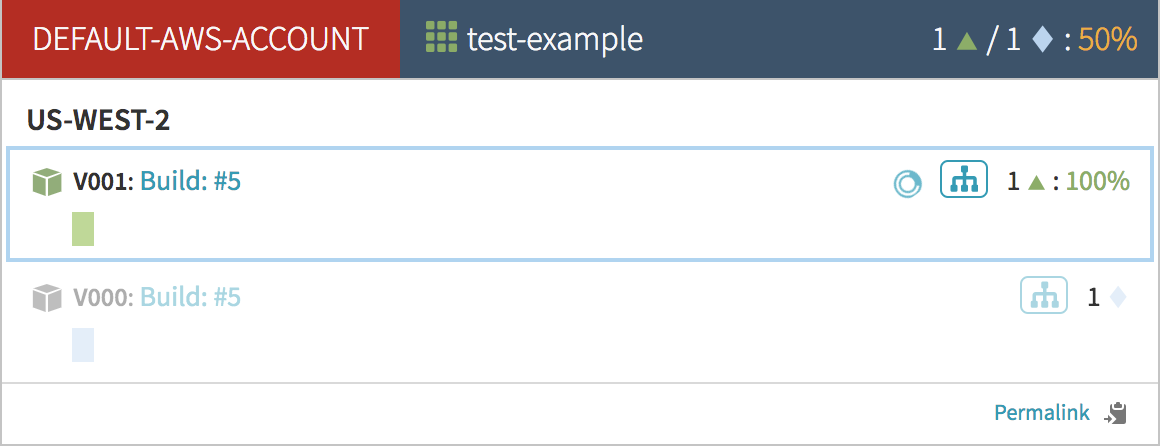
Once it passes its healthchecks and becomes healthy, it will visually indicate so by turning green. At this point Spinnaker will add the server group to the load balancer.
Immediately after that, the old server group is removed from the load balancer. Spinnaker will turn the old server group’s instances blue. This means that they are disabled and no longer receiving traffic.
Because of how I configured my deploy stage, the old Blue server group will stick around until I either manually scale it down or destroy it. If you like, you can configure your deploy stage to automatically scale down the old server group after the new one is healthy.
Common errors and troubleshooting
If you are having trouble try checking out some of these topics:
Deploy times out
Often when your deploy stage is timing out, it is because your instances are never becomming healthy. In this case, Spinnaker will keep terminating and replacing the instances.
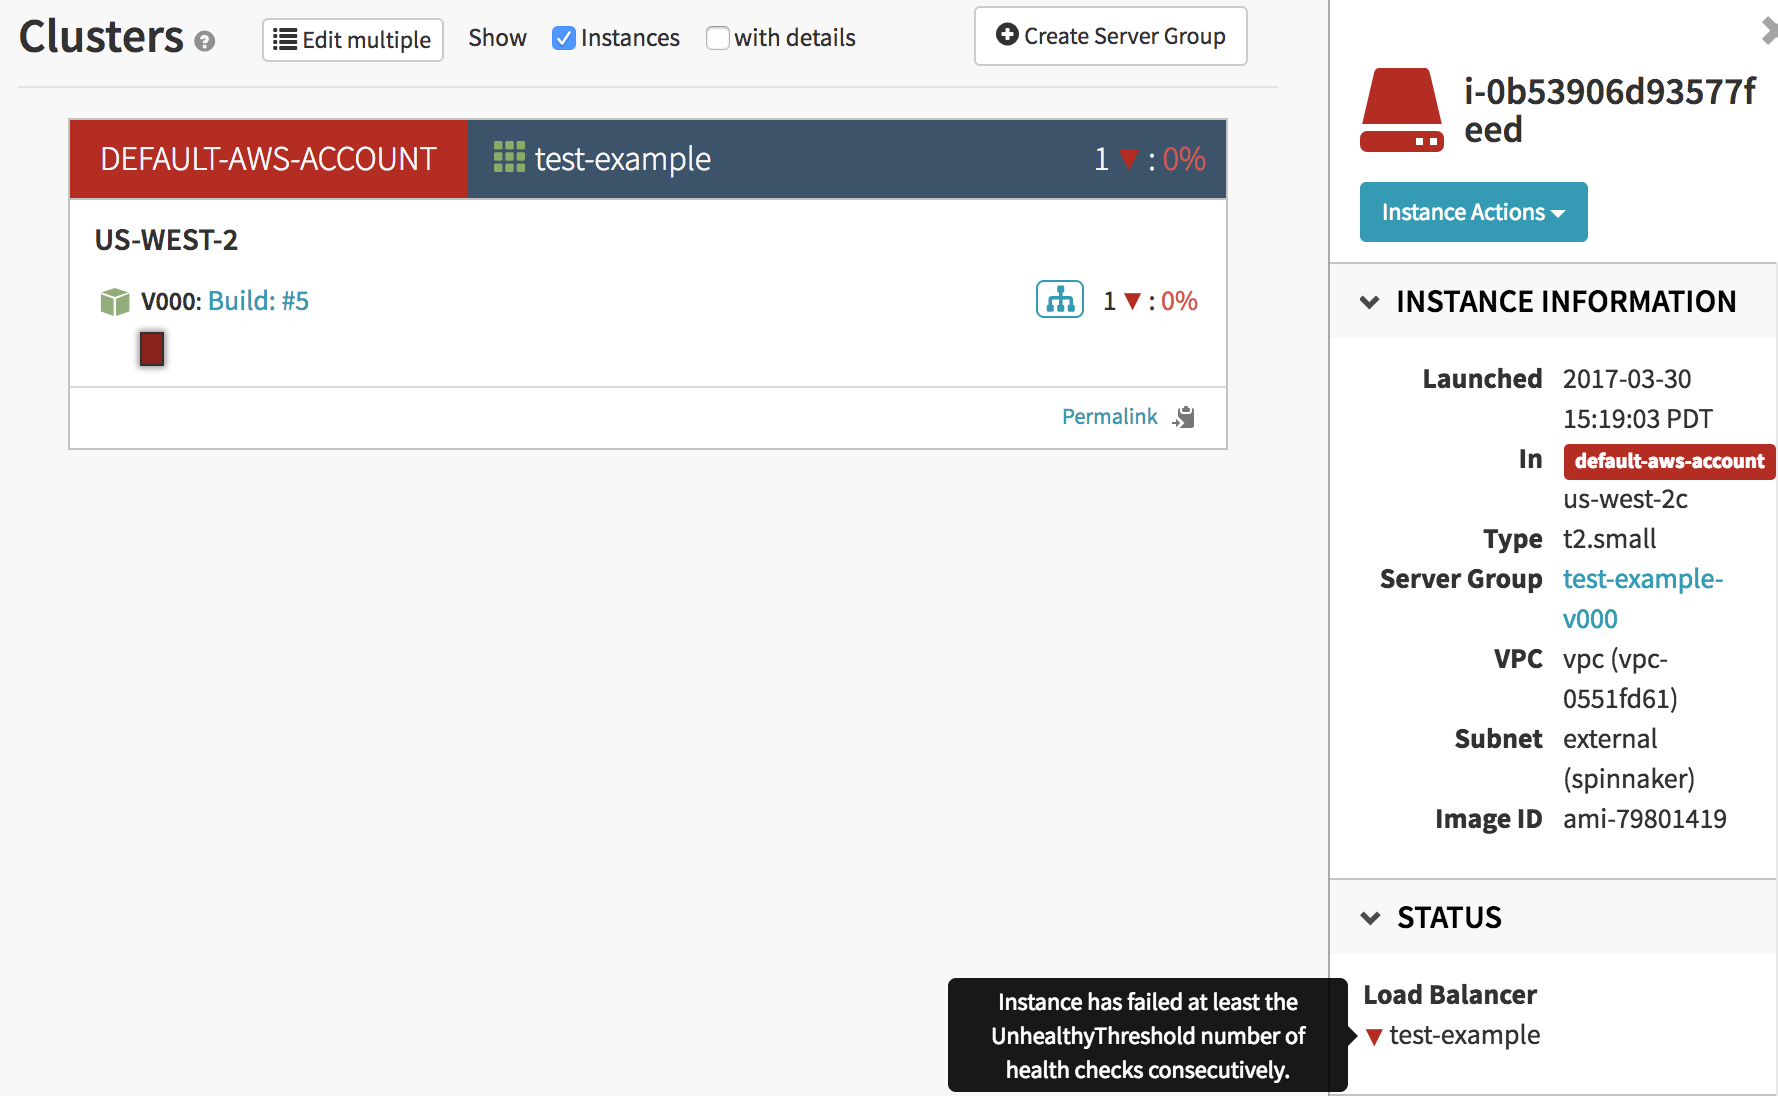
Investigating red instances
Select your red instance and hover your cursor over the red triangle next to the load balancer under the ‘Status’ section. This should display some helpful information for understanding why your instance is not deploying correctly.
Incorrect Healthcheck
You have the option when deploying a new server group to use either EC2 or ELB healthchecking. When instances aren’t passing this healthcheck they will be terminated and replaced. If you are experiencing strange behavior, double check that the correct healthcheck is selected.
Deploy AZs vs ELB AZs
It is possible to set your ELB to work with certain AZs but then deploy your server group to another AZ. If you have your healthcheck set to ELB, then your instances will never become healthy. You can tell when this happens by hovering you mouse over the red triangle described above.
Unknown errors
Sometimes you may encounter an ‘Unknown Error’ message when executing your deploy. Something like, “Shrink cluster: Exception: No reason provided.” These errors are almost always caused by a field having an incorrect value in the deploy configuration. This particular “Shrink cluster” error was caused by the server group’s region being invalid.
Deployment strategies
Red/Black (also known as Blue/Green)
This strategy will deploy a fresh server group and add it to the load balancer. The older server group will then be disabled.

When you configure this stragey you can choose to scale down the old server group. You can always scale it back up if you need it for a rollback. Also, you can choose how many old server groups to leave in the cluster.
Highlander
This strategy will create a new server group and add it to the load balancer. Once everything is healthy, the old server group(s) will be destroyed.
None
This strategy will deploy a new server group. It won’t do anything about the older server groups. They will just all be in the load balancer together like one big happy family!
What does disabled mean?
When an instance is disabled within Spinnaker, it is removed from all load balancers. Depending on how your application receives work, this may or may not stop your application from doing work. If your application receives work via the load balancer - like a web application - then it should actually be disabled. However, if you have an application that works similarly to pulling workloads off of a distributed queue (SQS, Kafka, etc), then removing it from a load balancer won’t change anything. In fact, it was probably never in a load balancer.
You can re-enable a server group by selecting it from the ‘Cluster’ screen, click the ‘Server Group Actions’ button on the right panel and click ‘Enable’.
UserData
You can pass custom information to your deployed instances through the ‘User Data’ field under the ‘Advanced Settings’ section of the deploy stage configuration.
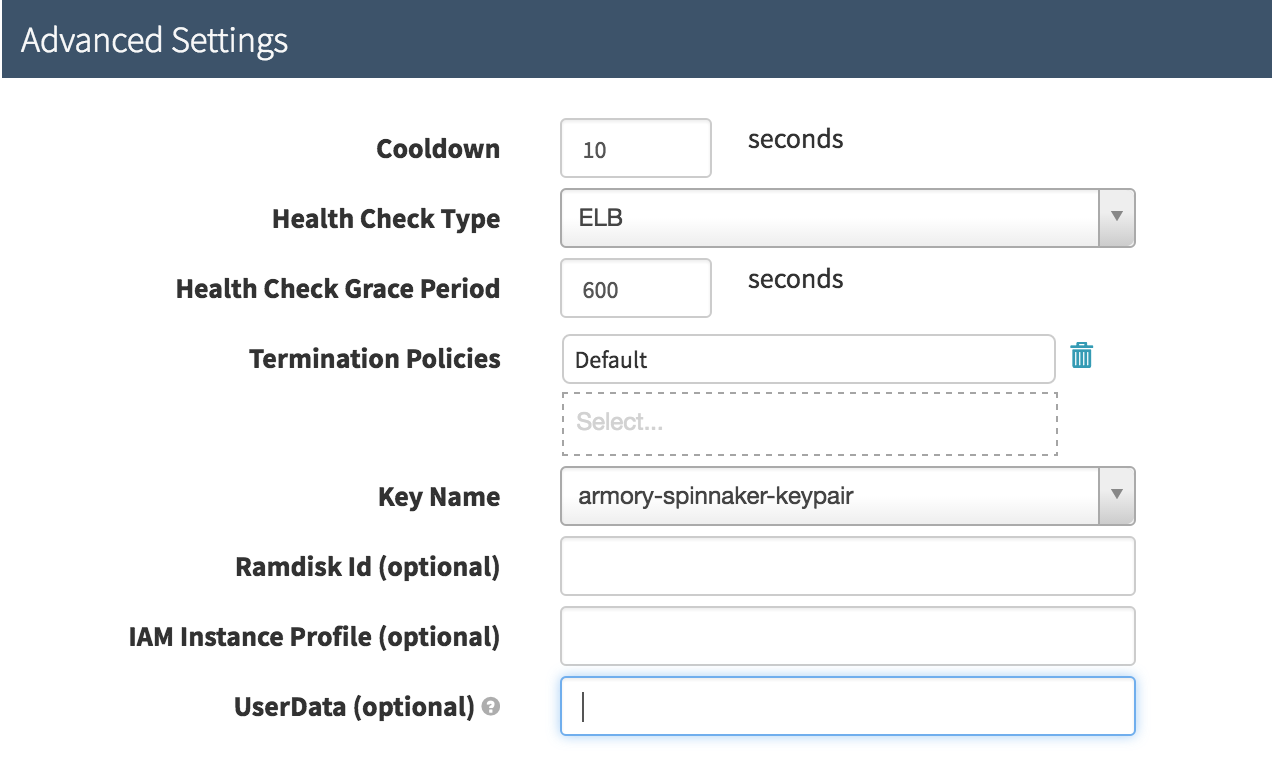
Make sure to base64 encode the content before putting it into the field in the options.
UserData issues
If the default Armory Spinnaker UserData doesn’t work with your instance launch sequence, there are two work-arounds you can use.
-
If the UserData you want to use is bash-compatible and will fit after that existing chunk of variables that Spinnaker puts in, you can just put your base64 encoded UserData into the cluster config.
-
Adjust the UserData template used by Spinnaker. There is a writeup by the Spinnaker Folks here. When we use that option we normally point udfRoot at something like /opt/spinnaker/config/custom-udf, and then add the custom-udf directory to the config package we release Spinnaker from. If you want to turn it off completely that means just adding the udfRoot option to clouddriver-local.yml, and putting a blank file at /opt/spinnaker/config/custom-udf/udf0 .
Passing environment data to your deployed instances
The default configuration of Armory Spinnaker creates a file /etc/default/server-env on every instance with information about its environment. In the example above, server-env looks like:
CLOUD_ACCOUNT="default-aws-account"
CLOUD_ACCOUNT_TYPE="default-aws-account"
CLOUD_ENVIRONMENT="default-aws-account"
CLOUD_SERVER_GROUP="test-example-v001"
CLOUD_CLUSTER="test-example"
CLOUD_STACK="example"
CLOUD_DETAIL=""
EC2_REGION="us-west-2"
LAUNCH_CONFIG="test-example-v001-03302017224619"
Rolling back
Yup. Sometimes you need to rollback to a known previously working state.
Automatically
From the ‘Cluster’ tab, select a server group. Click the button on the right pane labeled ‘Server Group Actions’ and press ‘Rollback’
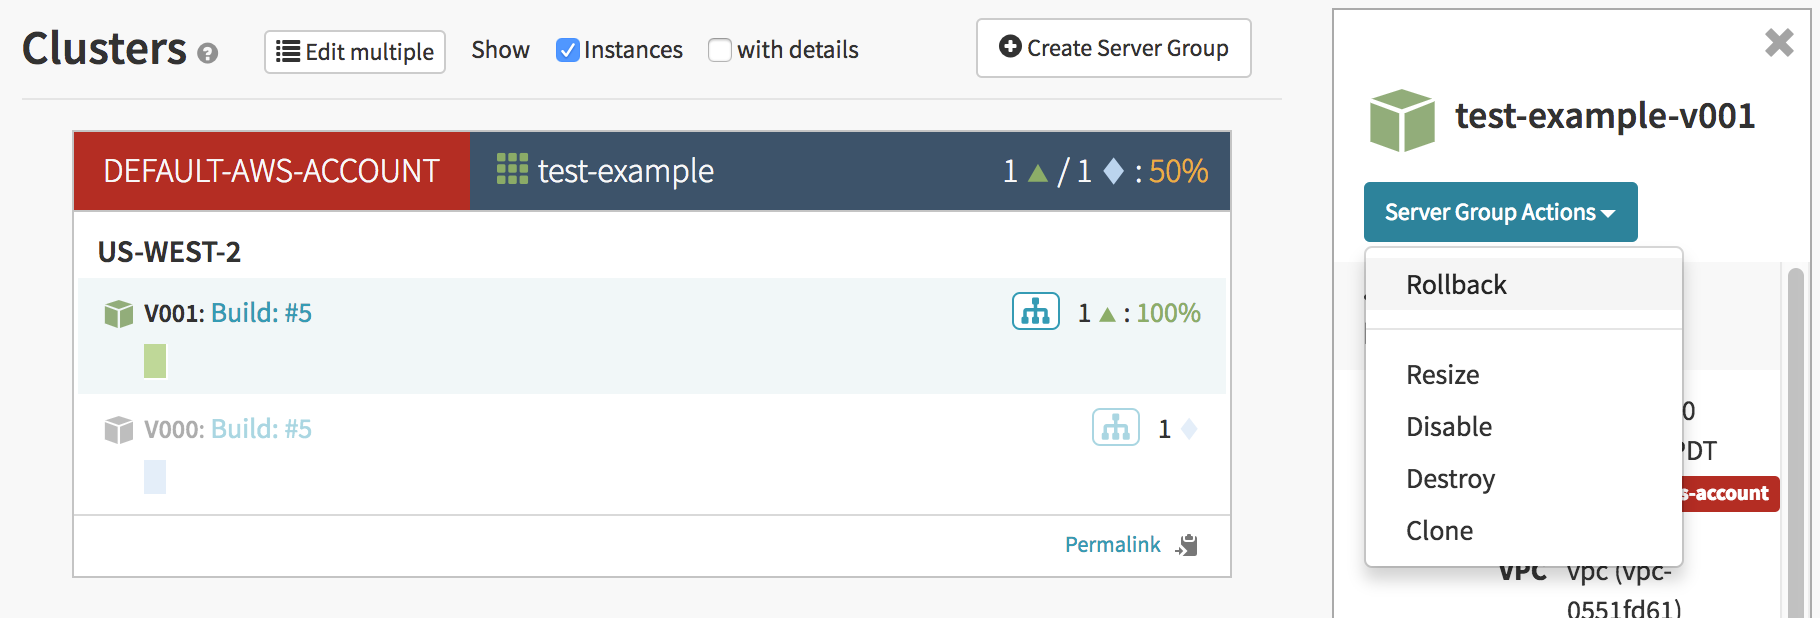
In the window that pops up, you can select which server group to rollback to.
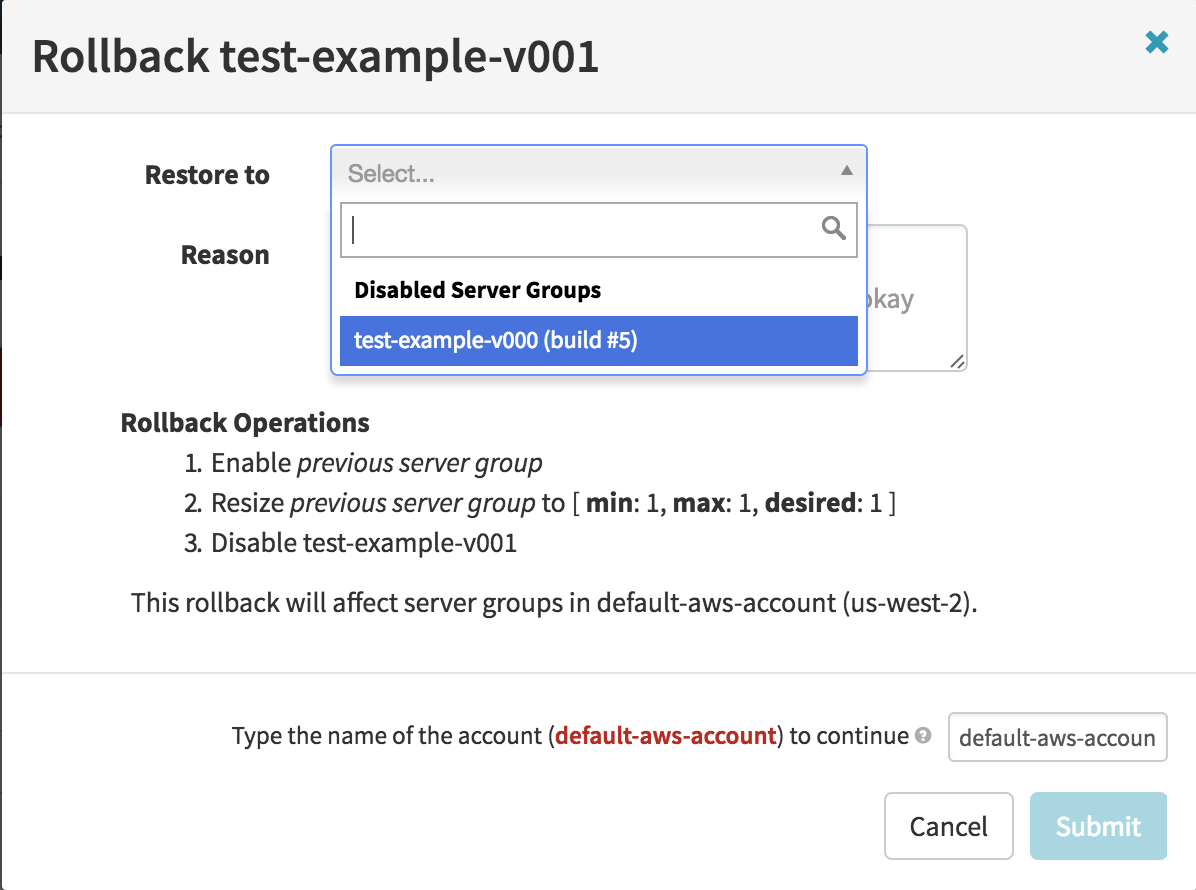
The server group that you select will re-enabled and scaled up to the necessary number of replicas. Then the rolled back server group will be disabled.
Manually
If you are ever in a situation where you need to roll back without Spinnaker, you can do so from the AWS console. You will basically run through the process that Spinnaker would do automatically:
- Scale up the older Auto Scaling Groups (ASG)
- Add those instances to the ELB
- Remove the newer ASG’s instances from the ELB
- Scale down or delete the new ASG
Additional Launch Block Devices
If you want additional block devices or a larger root partition you’ll need to add an a new list to the pipeline JSON. Unfortunately at this time there is no UI to add block devices.
- Edit Your Pipelines JSON
- Find your deployment dictionary. You’ll need to add the object of pairs for each cluster definition.
- Add your custom block devices for launch under the key
blockDevices. - Make sure that
AMI Block Device Mappingsis set toDefaults for selected instance type.
Block Devices Definition
"blockDevices": [
  {
    "deleteOnTermination": [true|false],
    "deviceName": "[device string]",
    "iops": [integer ranging from 100-20000],
    "size": [integer, size in GB, range from 1GB-64TB],
    "volumeType": "[st1|io1|gp2|sc1]"
  }
]
Example of Additional Block Devices
"clusters": [
        {
          "account": "my-aws-account",
          "application": "myapplication",
          "blockDevices": [
            {
              "deleteOnTermination": true,
              "deviceName": "/dev/sda1",
              "size": 32,
              "volumeType": "gp2"
            }
          ]
          "copySourceCustomBlockDeviceMappings": false,
          "useAmiBlockDeviceMappings": false
        },
        ...
]
VPC Subnet Type
Throughout Spinnaker, Subnet Type is an abstraction of subnets within AWS.
You can find fields that you use to specify VPC Subnet type when creating load balancers, deploying server groups, etc.
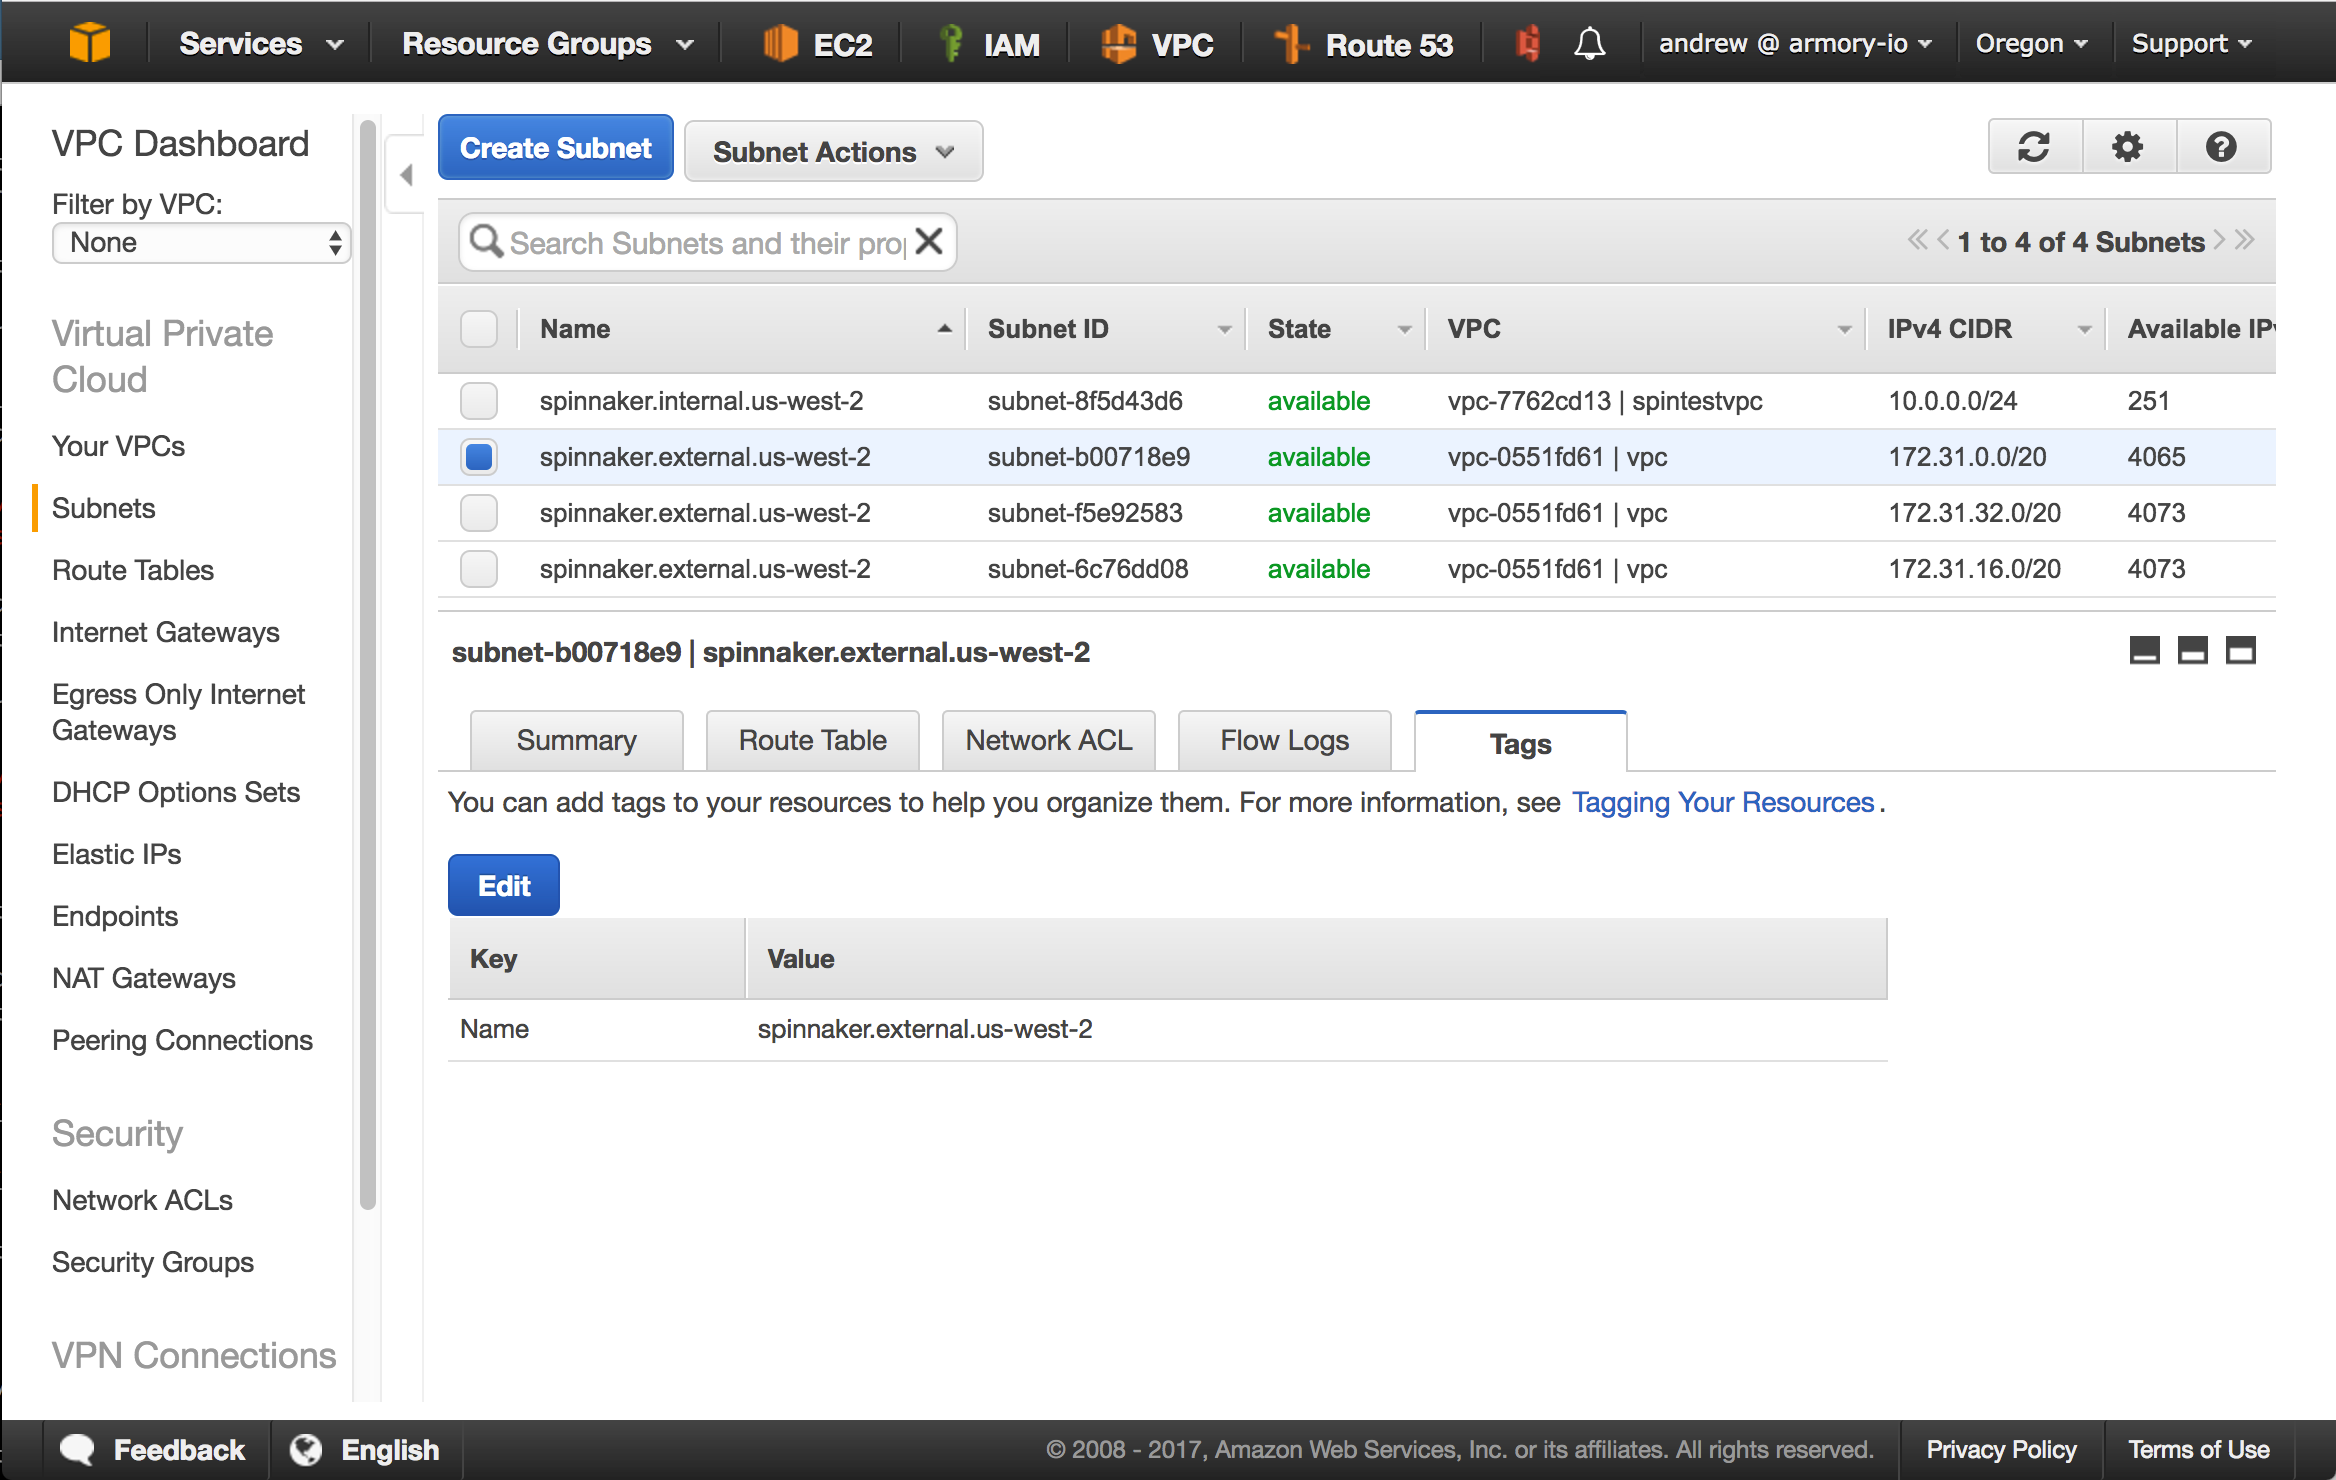
In order to use a subnet within Spinnaker, you will need to tag it in AWS a certain way.
There are two ways you can tag them. One option is to use the convention spinnaker.<internal|external>.<region> for the subnet’s name. In the screenshot below, you can see that is what I have done on my subnets.
Another option is to create a tag named immutable_metadata with value {"purpose": "MySubnetNameInsideSpinnaker"}