- DNS Preparation
- Exposing Spinnaker on EKS with a public Load Balancer
- Exposing Spinnaker on EKS with an internal Load balancer
- Exposing Spinnaker on GKE with Ingress
- HTTP/HTTPS Redirects
DNS Preparation
We’ll be setting up two CNAME entries in our DNS in this example; we won’t be
able to actually configure the DNS until we get an A record from AWS after
creating the LoadBalancer, but we’ll need to select the names in order to configure
the LoadBalancer. For this tutorial, we’ve selected demo.armory.io to be
our Deck service (the UI), and gate.demo.armory.io to be our Gate service
(the API).
Exposing Spinnaker on EKS with a public Load Balancer
Create a LoadBalancer service
While there are many ways to expose Spinnaker, we find the method described in this post to be the easiest way to get started. If your organization has other requirements, this post may be helpful as you start working through the process.
Operator
Update your SpinnakerService manifest with the following example expose configuration, which will automatically create one Kubernetes service LoadBalancer for the API (Gate) and one for the UI (Deck):
apiversion: spinnaker.io/v1alpha2
kind: SpinnakerService
metadata:
  name: spinnaker
spec:
  ...  # rest of config omitted for brevity
  expose:
    type: service
    service:
      type: loadbalancer
Save and apply the configuration. After some time, you can see the LoadBalancer CNAMEs that were created:
NAMESPACE={spinnaker namespace}
API_URL=$(kubectl -n $NAMESPACE get spinsvc spinnaker -o jsonpath='{.status.apiUrl}')
UI_URL=$(kubectl -n $NAMESPACE get spinsvc spinnaker -o jsonpath='{.status.uiUrl}')
Halyard
First, we’ll start by creating LoadBalancer Services which will expose the API (Gate) and the UI (Deck) via a Load Balancer in your cloud provider. We’ll do this by running the commands below and creating the spin-gate-public and spin-deck-public Services.
NAMESPACE is the Kubernetes namespace where your Spinnaker install is located. Halyard defaults to spinnaker unless explicitly overridden.
Note: If you want to secure each endpoint with SSL, change it to
443and continue through the guide.
export NAMESPACE=spinnaker
kubectl -n ${NAMESPACE} expose service spin-gate --type LoadBalancer \
  --port 80,443 \
  --target-port 8084 \
  --name spin-gate-public

kubectl -n ${NAMESPACE} expose service spin-deck --type LoadBalancer \
  --port 80,443 \
  --target-port 9000 \
  --name spin-deck-public
Once these Services have been created, we’ll need to update our Spinnaker deployment so that the UI understands where the API is located. To do this, we’ll use Halyard to override the base URL for both the API and the UI and then redeploy Spinnaker.
# use the newly created LBs
export NAMESPACE={namespace}
export API_URL=$(kubectl -n $NAMESPACE get svc spin-gate-public -o jsonpath='{.status.loadBalancer.ingress[0].hostname}')
export UI_URL=$(kubectl -n $NAMESPACE get svc spin-deck-public -o jsonpath='{.status.loadBalancer.ingress[0].hostname}')

# or use DNS records
# export API_URL=spinnaker-gate.armory.io
# export UI_URL=spinnaker.armory.io

# Note, we're not using SSL yet, later in the guide we will.
hal config security api edit --override-base-url http://${API_URL}
hal config security ui edit --override-base-url http://${UI_URL}
hal deploy apply
If you have a DNS in mind, set it up like the following example:
spinnaker-gate.armory.io CNAME --> (spin-gate-public dns) aaaaa-1111.us-west-2.elb.amazonaws.com
spinnaker.armory.io      CNAME --> (spin-deck-public dns) aaaaa-2222.us-west-2.elb.amazonaws.com
Secure with SSL on EKS
This tutorial presumes you’ve already created a certificate in the AWS Certificate Manager.
Operator
Update and apply the SpinnakerService manifest to specify the DNS names for Gate and Deck, and to provide annotations specific for EKS LoadBalancers:
apiversion: spinnaker.io/v1alpha2
kind: SpinnakerService
metadata:
  name: spinnaker
spec:
  spinnakerConfig:
    config:
      security:
        apiSecurity:
          overrideBaseUrl: https://spinnaker-gate.armory.io  # Specify your DNS name for Gate with https scheme
        uiSecurity:
          overrideBaseUrl: https://spinnaker.armory.io       # Specify your DNS name for Deck with https scheme
        ...  # rest of config omitted for brevity
  expose:
    type: service
    service:
      type: LoadBalancer
      annotations:
        service.beta.kubernetes.io/aws-load-balancer-backend-protocol: http
        service.beta.kubernetes.io/aws-load-balancer-ssl-cert: <ACM CERT ARN>  # Replace with your cert ARN
        service.beta.kubernetes.io/aws-load-balancer-ssl-ports: 80,443
Assuming that Spinnaker is installed in spinnaker namespace:
kubectl -n spinnaker apply -f spinnakerservice.yml
Halyard
Note: If you created the services with port 8084 and 9000, you will need to edit them to make SSL work. To do so, run
kubectl -n spinnaker edit service spin-gate-publicandkubectl -n spinnaker edit service spin-deck-public. Change the public port to 443.
First get the certificate arn and run
export ACM_CERT_ARN="arn:::::your:cert"
Edit the LoadBalancer service spin-gate-public and spin-deck-public we will include 3 annotations for each.
kubectl -n ${NAMESPACE} annotate svc spin-gate-public service.beta.kubernetes.io/aws-load-balancer-backend-protocol=http
kubectl -n ${NAMESPACE} annotate svc spin-gate-public service.beta.kubernetes.io/aws-load-balancer-ssl-cert=${ACM_CERT_ARN}
kubectl -n ${NAMESPACE} annotate svc spin-gate-public service.beta.kubernetes.io/aws-load-balancer-ssl-ports=80,443

kubectl -n ${NAMESPACE} annotate svc spin-deck-public service.beta.kubernetes.io/aws-load-balancer-backend-protocol=http
kubectl -n ${NAMESPACE} annotate svc spin-deck-public service.beta.kubernetes.io/aws-load-balancer-ssl-cert=${ACM_CERT_ARN}
kubectl -n ${NAMESPACE} annotate svc spin-deck-public service.beta.kubernetes.io/aws-load-balancer-ssl-ports=80,443
We’ll need to update the internal URLs (Deck will complain about trying to call out to an HTTP resource from an HTTPS request). Update the URLs like we did before, but changing the protocols to https:
hal config security api edit --override-base-url https://gate.demo.armory.io
hal config security ui edit --override-base-url https://demo.armory.io
hal deploy apply
Enabling sticky sessions
If your Armory Spinnaker installation will be using authentication and you expect to scale the API server (Gate) beyond more than one instance you’ll want to enable sticky sessions. This will ensure that clients will connect and authenticate with the same server each time. Otherwise, you may be forced to reauthenticate if you get directed to a new server. To enable sticky sessions, you’ll want to enable session affinity on the Gate service created above.
GATE_SVC=<spin-gate/spin-gate-public>  # spin-gate if using Spinnaker Operator, spin-gate-public if using Halyard
kubectl -n ${NAMESPACE} patch service/$GATE_SVC --patch '{"spec": {"sessionAffinity": "ClientIP"}}'
For more details about session affinity, see the Kubernetes documentation on Services.
Exposing Spinnaker on EKS with an internal Load balancer
In this option the goal is to use AWS ALB’s of type internal for exposing Spinnaker only within an organization’s private VPC. This consists of 3 steps: configuring Kubernetes services of type NodePort, creating AWS internal ALB’s and updating Spinnaker with final DNS names.
Step 1: Create Kubernetes NodePort services
A NodePort Kubernetes service opens the same port (automatically chosen) on all EKS worker nodes, and forwards requests to internal pods. In this case we’ll be creating two services: one for Deck (Spinnaker’s UI) and one for Gate (Spinnaker’s API).
Operator
apiversion: spinnaker.io/v1alpha2
kind: SpinnakerService
metadata:
  name: spinnaker
spec:
  ...  # rest of config omitted for brevity
  expose:
    type: service
    service:
      type: NodePort
      ...  # rest of config omitted for brevity
Assuming that Spinnaker is installed in spinnaker namespace:
kubectl -n spinnaker apply -f spinnakerservice.yml
After a few seconds you can view which ports were opened in EKS worker nodes, you’ll need them in the next step:
DECK_PORT=$(kubectl get service spin-deck -o jsonpath='{.spec.ports[0].nodePort}')
GATE_PORT=$(kubectl get service spin-gate -o jsonpath='{.spec.ports[0].nodePort}')
Halyard
Replace the namespace by the one where spinnaker is installed:
export NAMESPACE=spinnaker
kubectl -n ${NAMESPACE} expose service spin-gate --type NodePort \
  --port 8084 \
  --target-port 8084 \
  --name spin-gate-nodeport

kubectl -n ${NAMESPACE} expose service spin-deck --type NodePort \
  --port 9000 \
  --target-port 9000 \
  --name spin-deck-nodeport
After a few seconds you can view which ports were opened in EKS worker nodes, you’ll need them in the next step:
DECK_PORT=$(kubectl get service spin-deck-nodeport -o jsonpath='{.spec.ports[0].nodePort}')
GATE_PORT=$(kubectl get service spin-gate-nodeport -o jsonpath='{.spec.ports[0].nodePort}')
Step 2: Create AWS internal load balancers
We’ll describe how to create these load balancers from AWS console, but you can use any preferred method for provisioning infrastructure. We’ll create a Load Balancer for Deck and other for Gate.
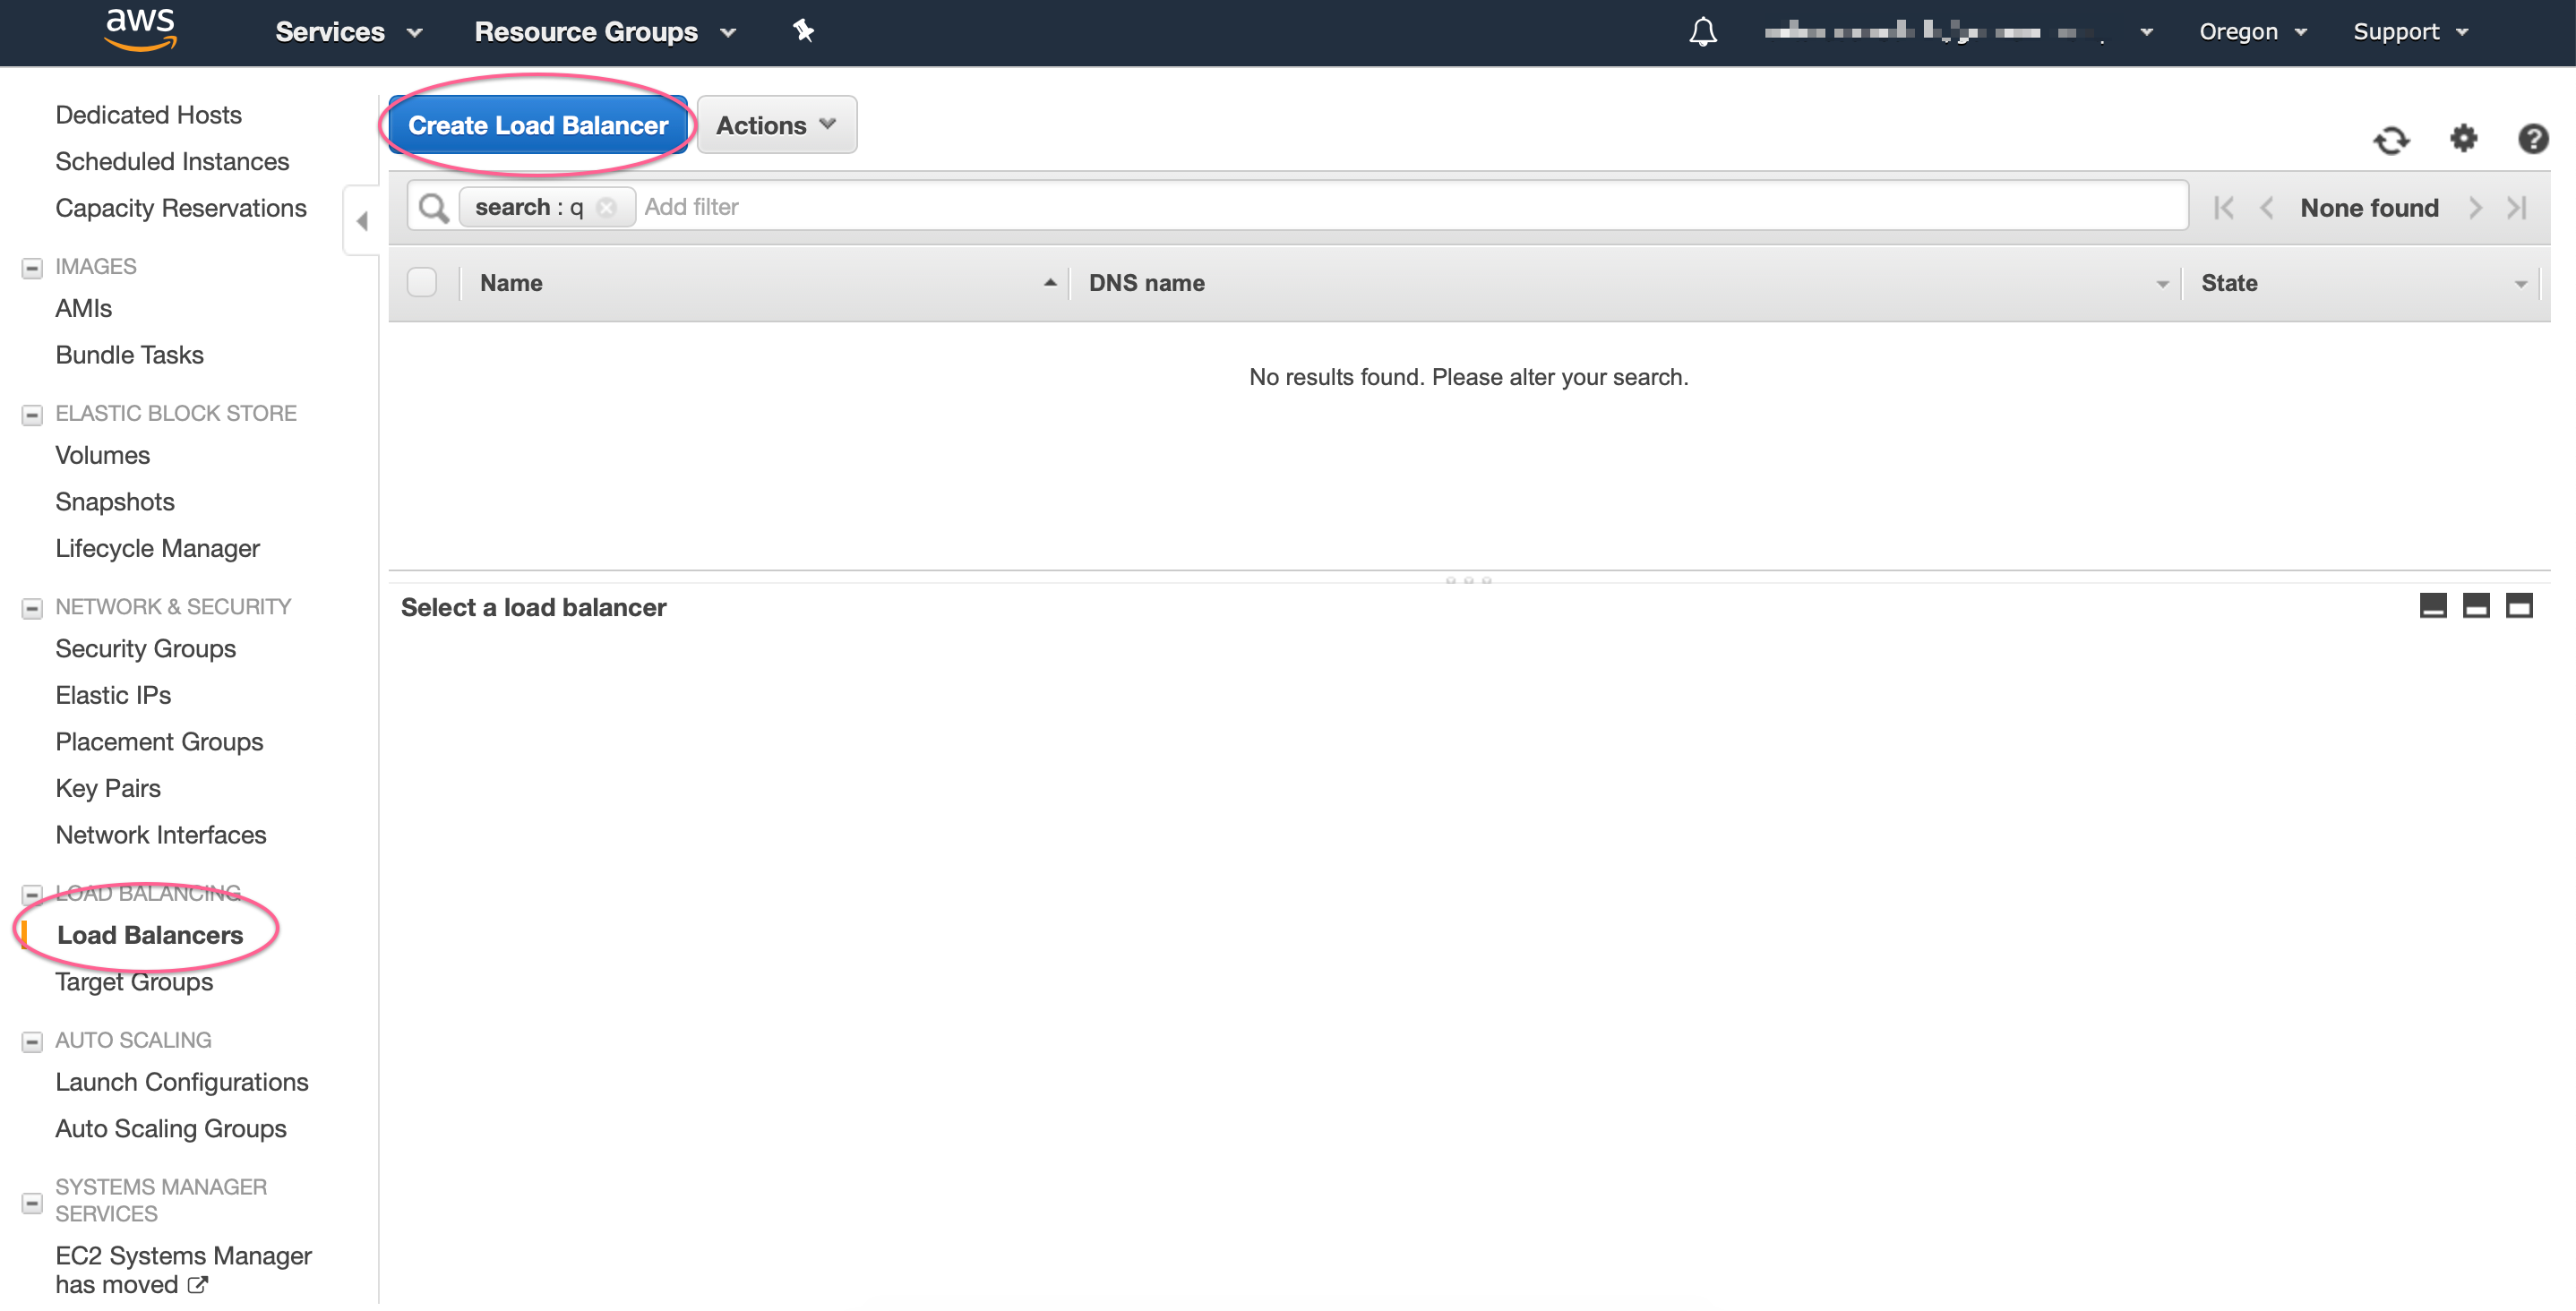
Navigate to AWS EC2 management console, in Load Balancers section, and click on Create New Load Balancer
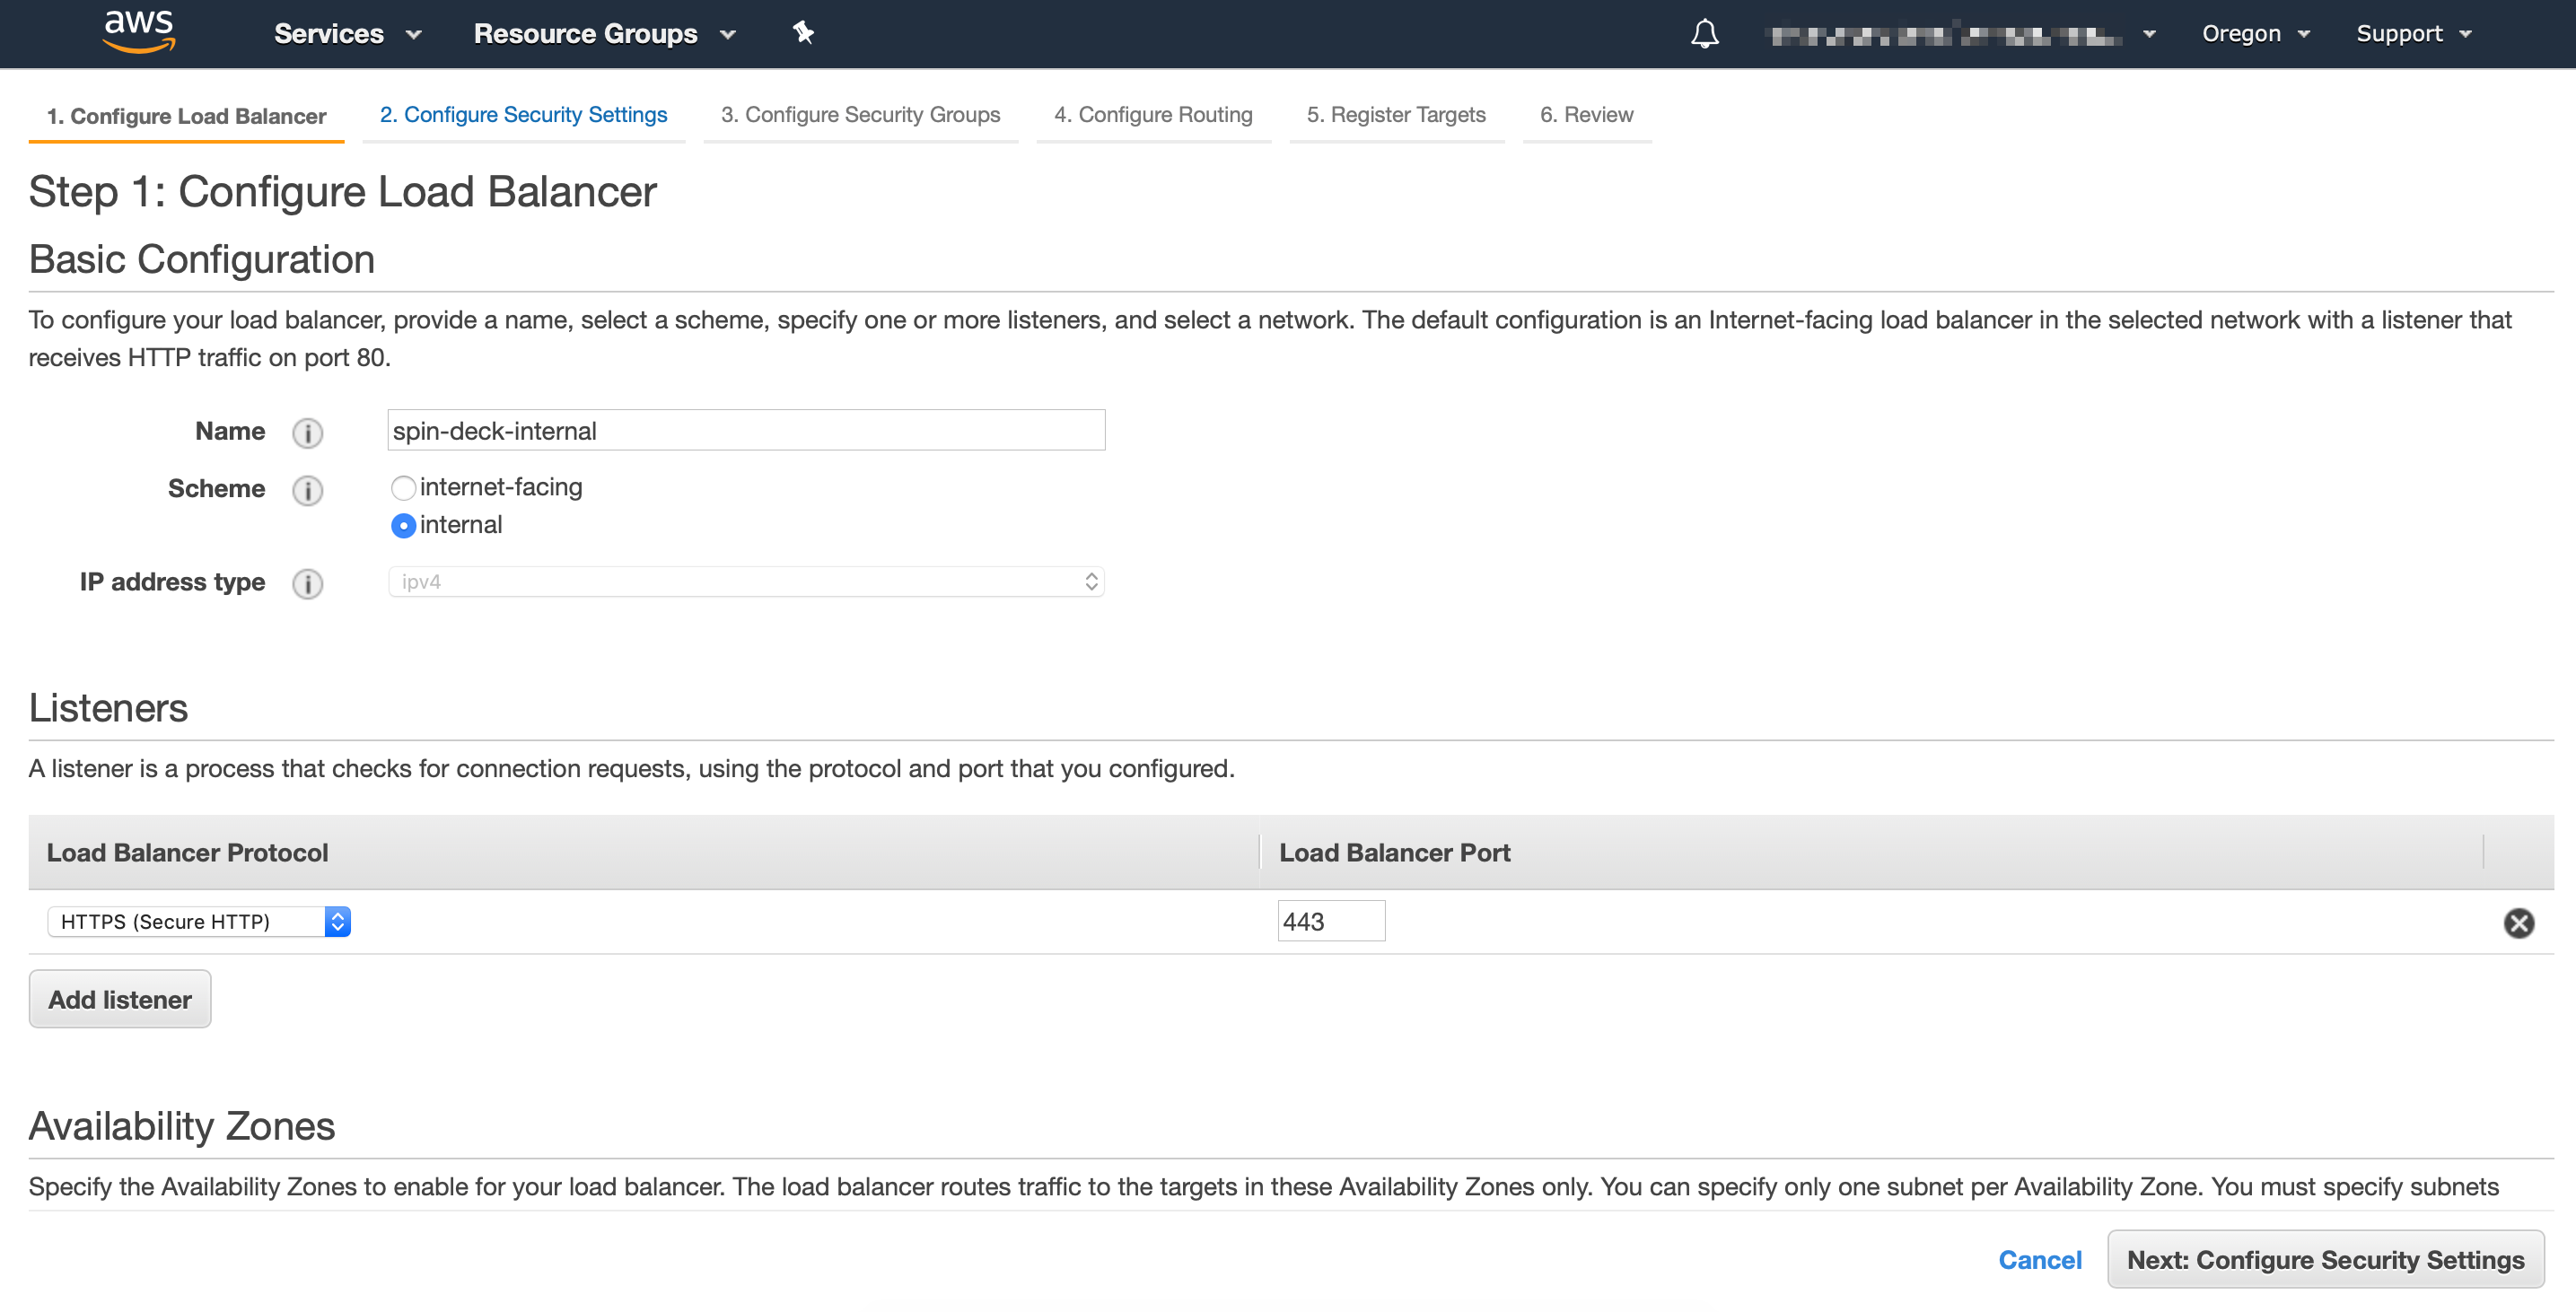
We’ll be creating a new Application Load Balancer:

Make sure to select internal scheme, and if you have a SSL certificate available, use HTTPS protocol:
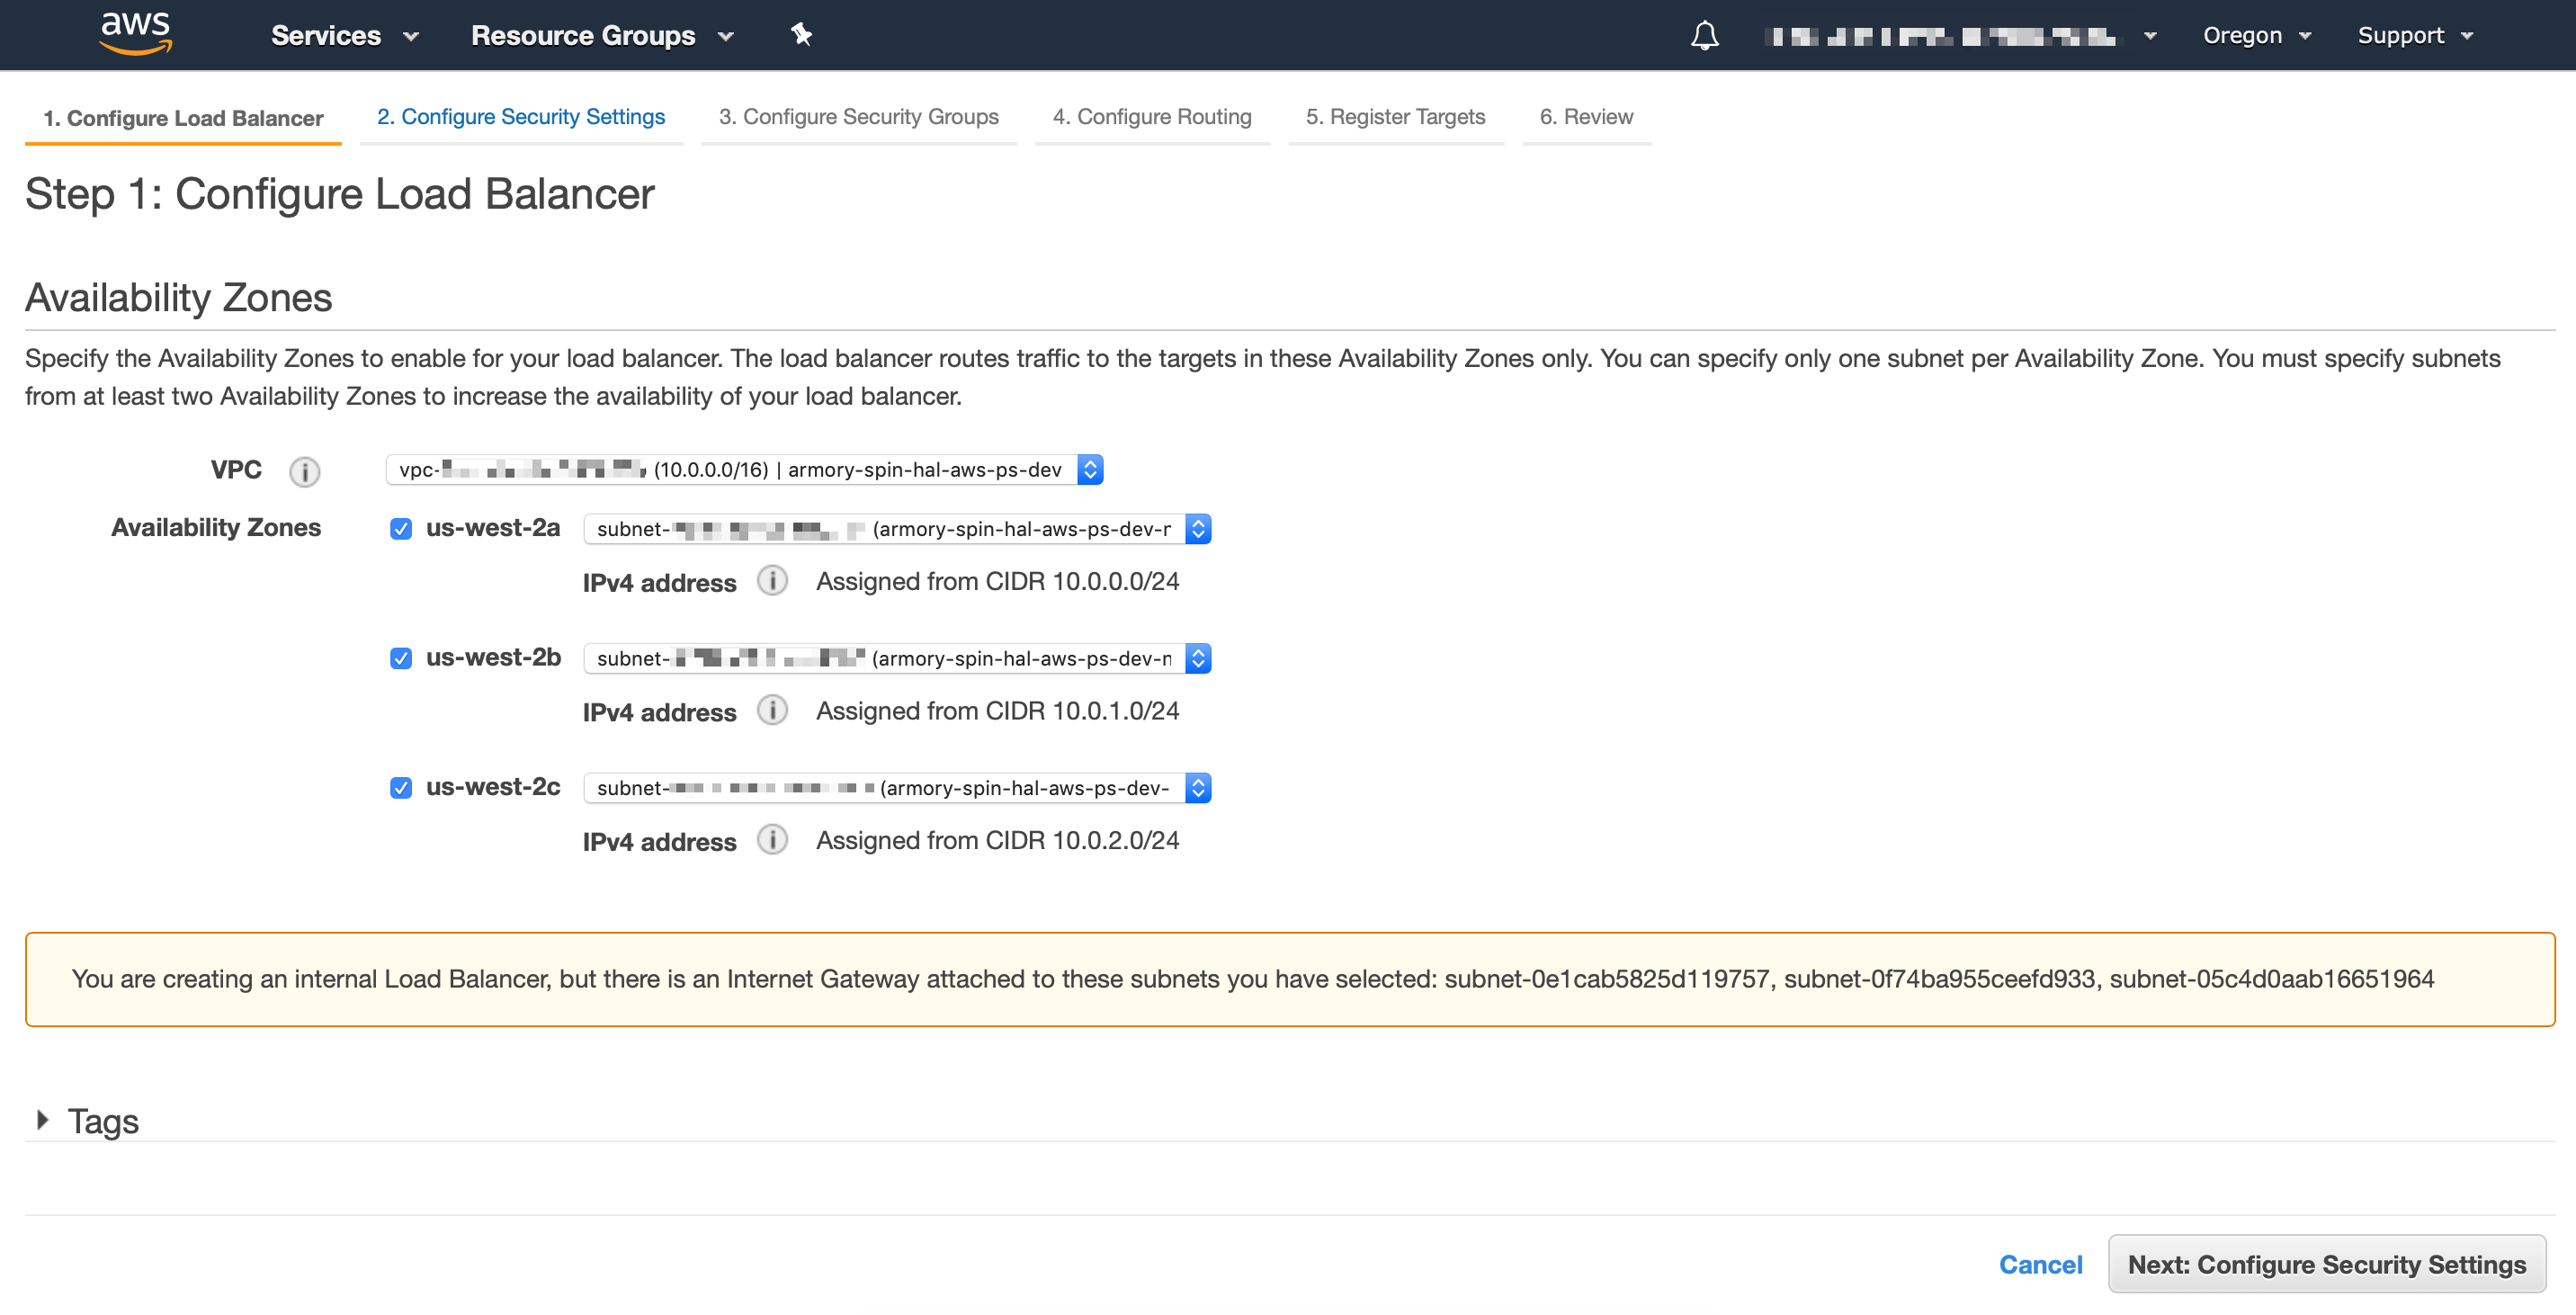
Select the VPC and subnets where EKS worker nodes live:
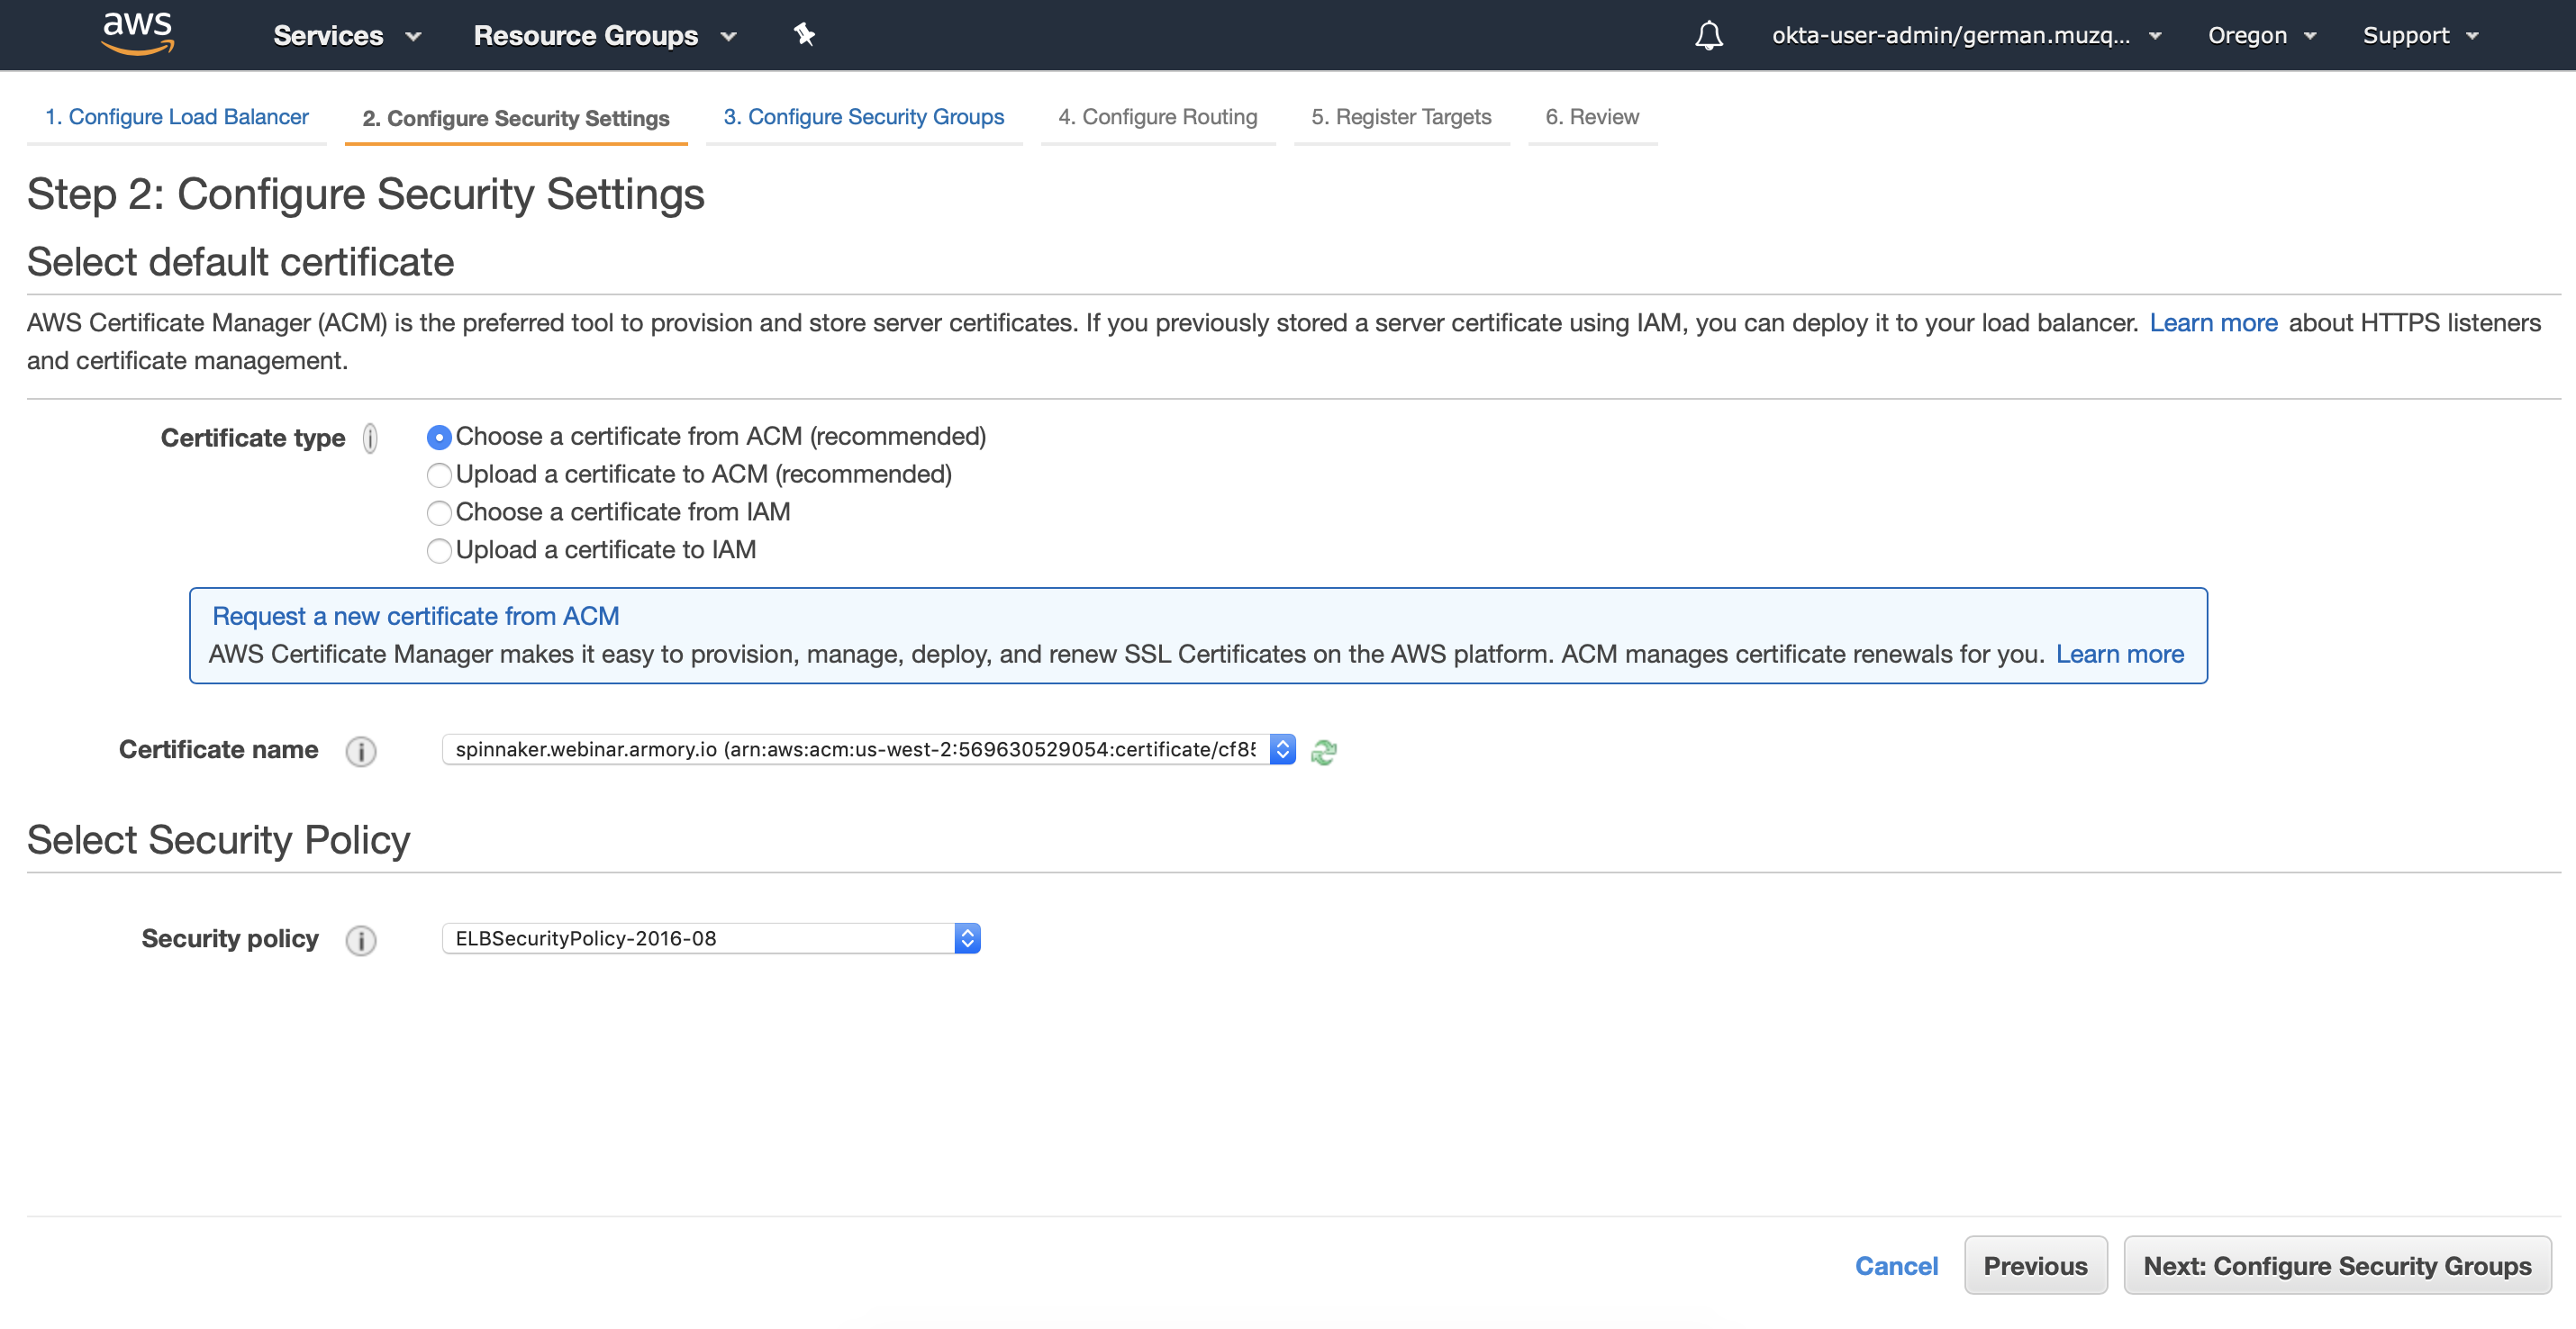
If you selected HTTPS for the protocol, you can configure here the ACM certificate:
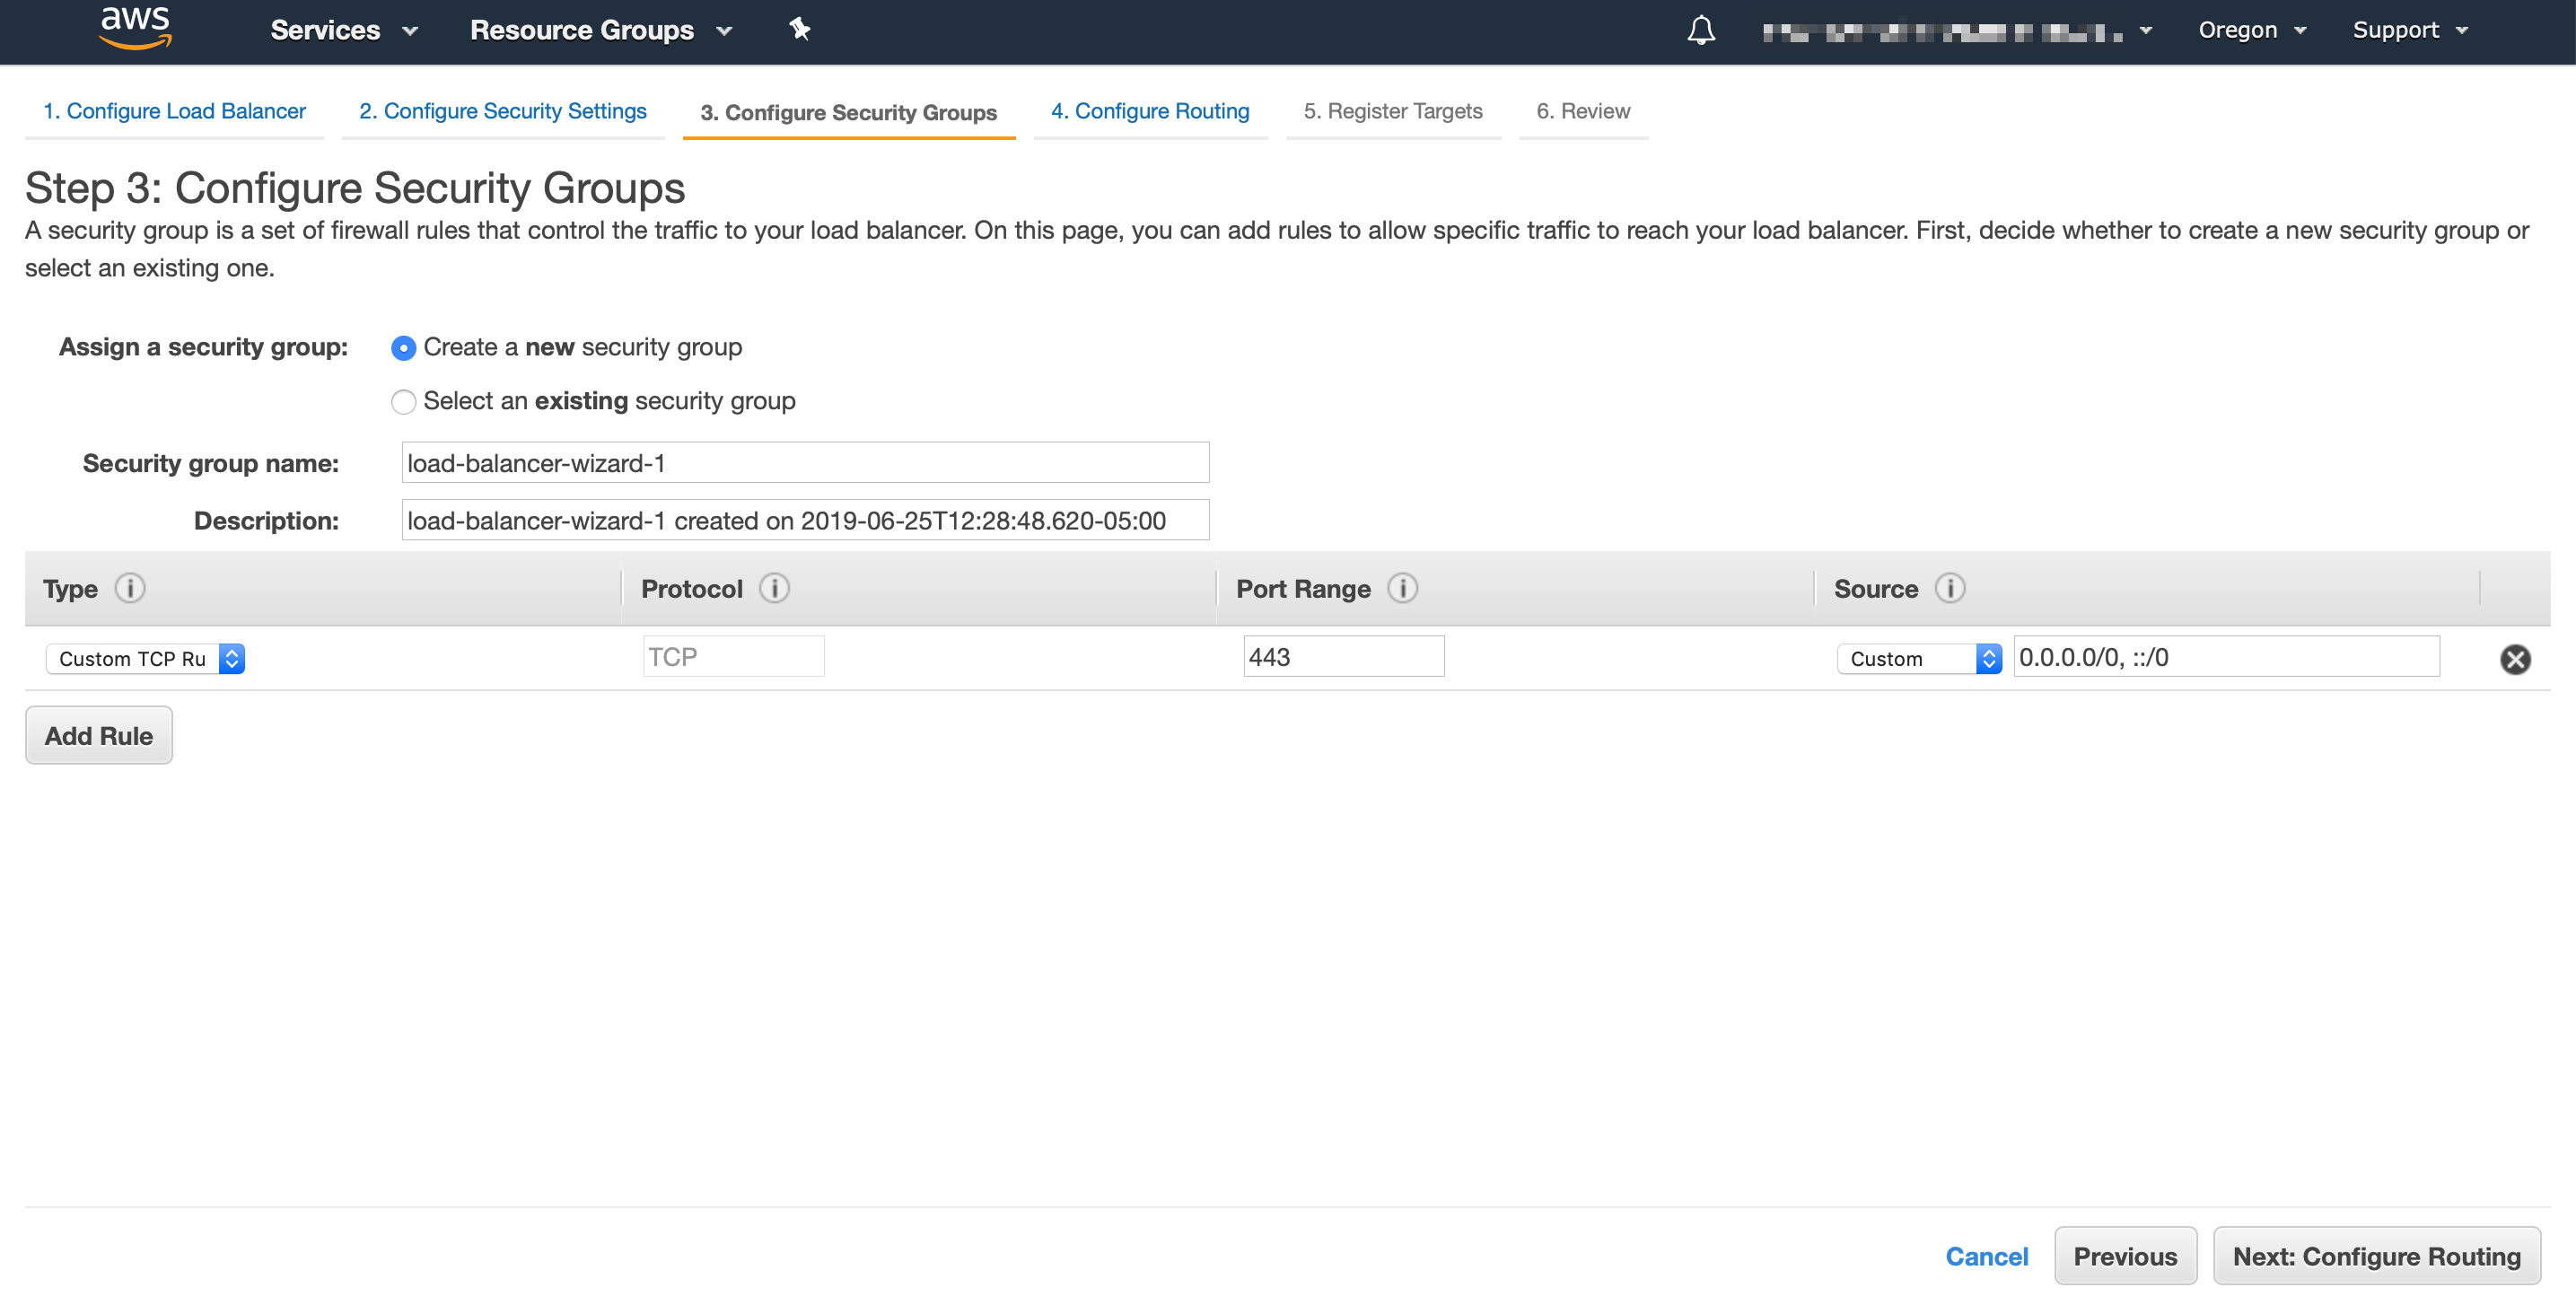
In the next screen you can either select an existing security group or create a new one for your load balancer:
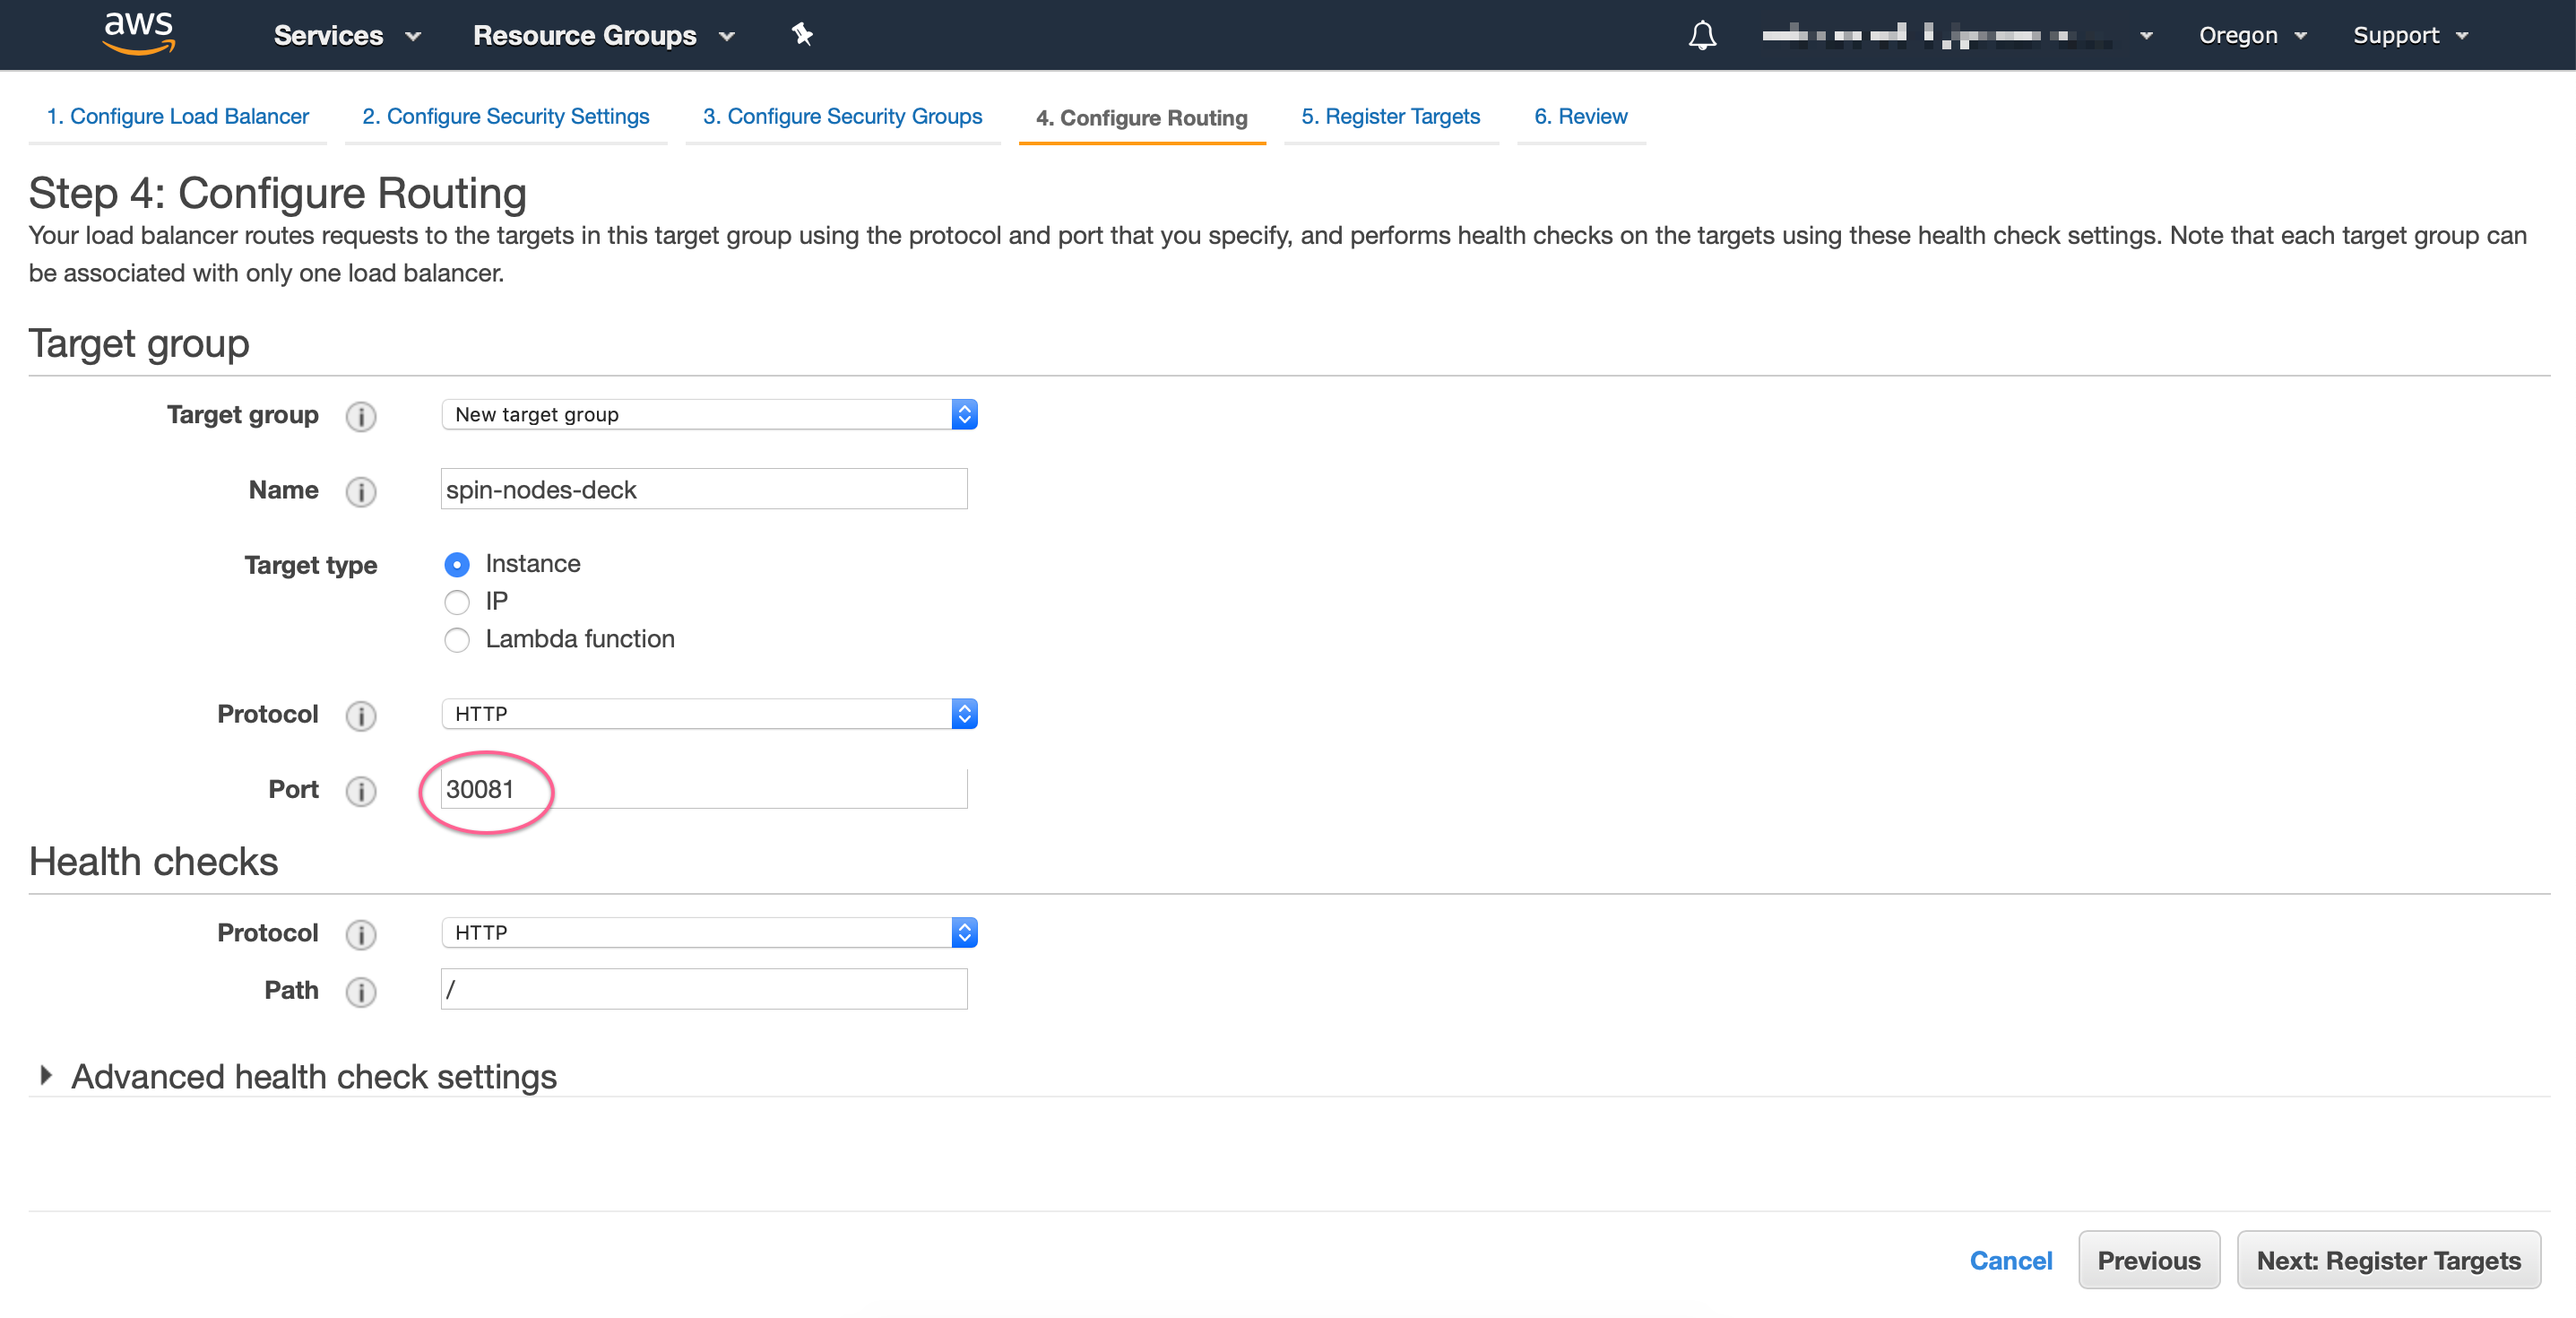
Now you want to create a new target group that points to DECK_PORT or GATE_PORT, taken from the NodePort created in the previous step:
Finally, you need to select all EKS worker nodes to be registered with the load balancer target, review and save the changes:
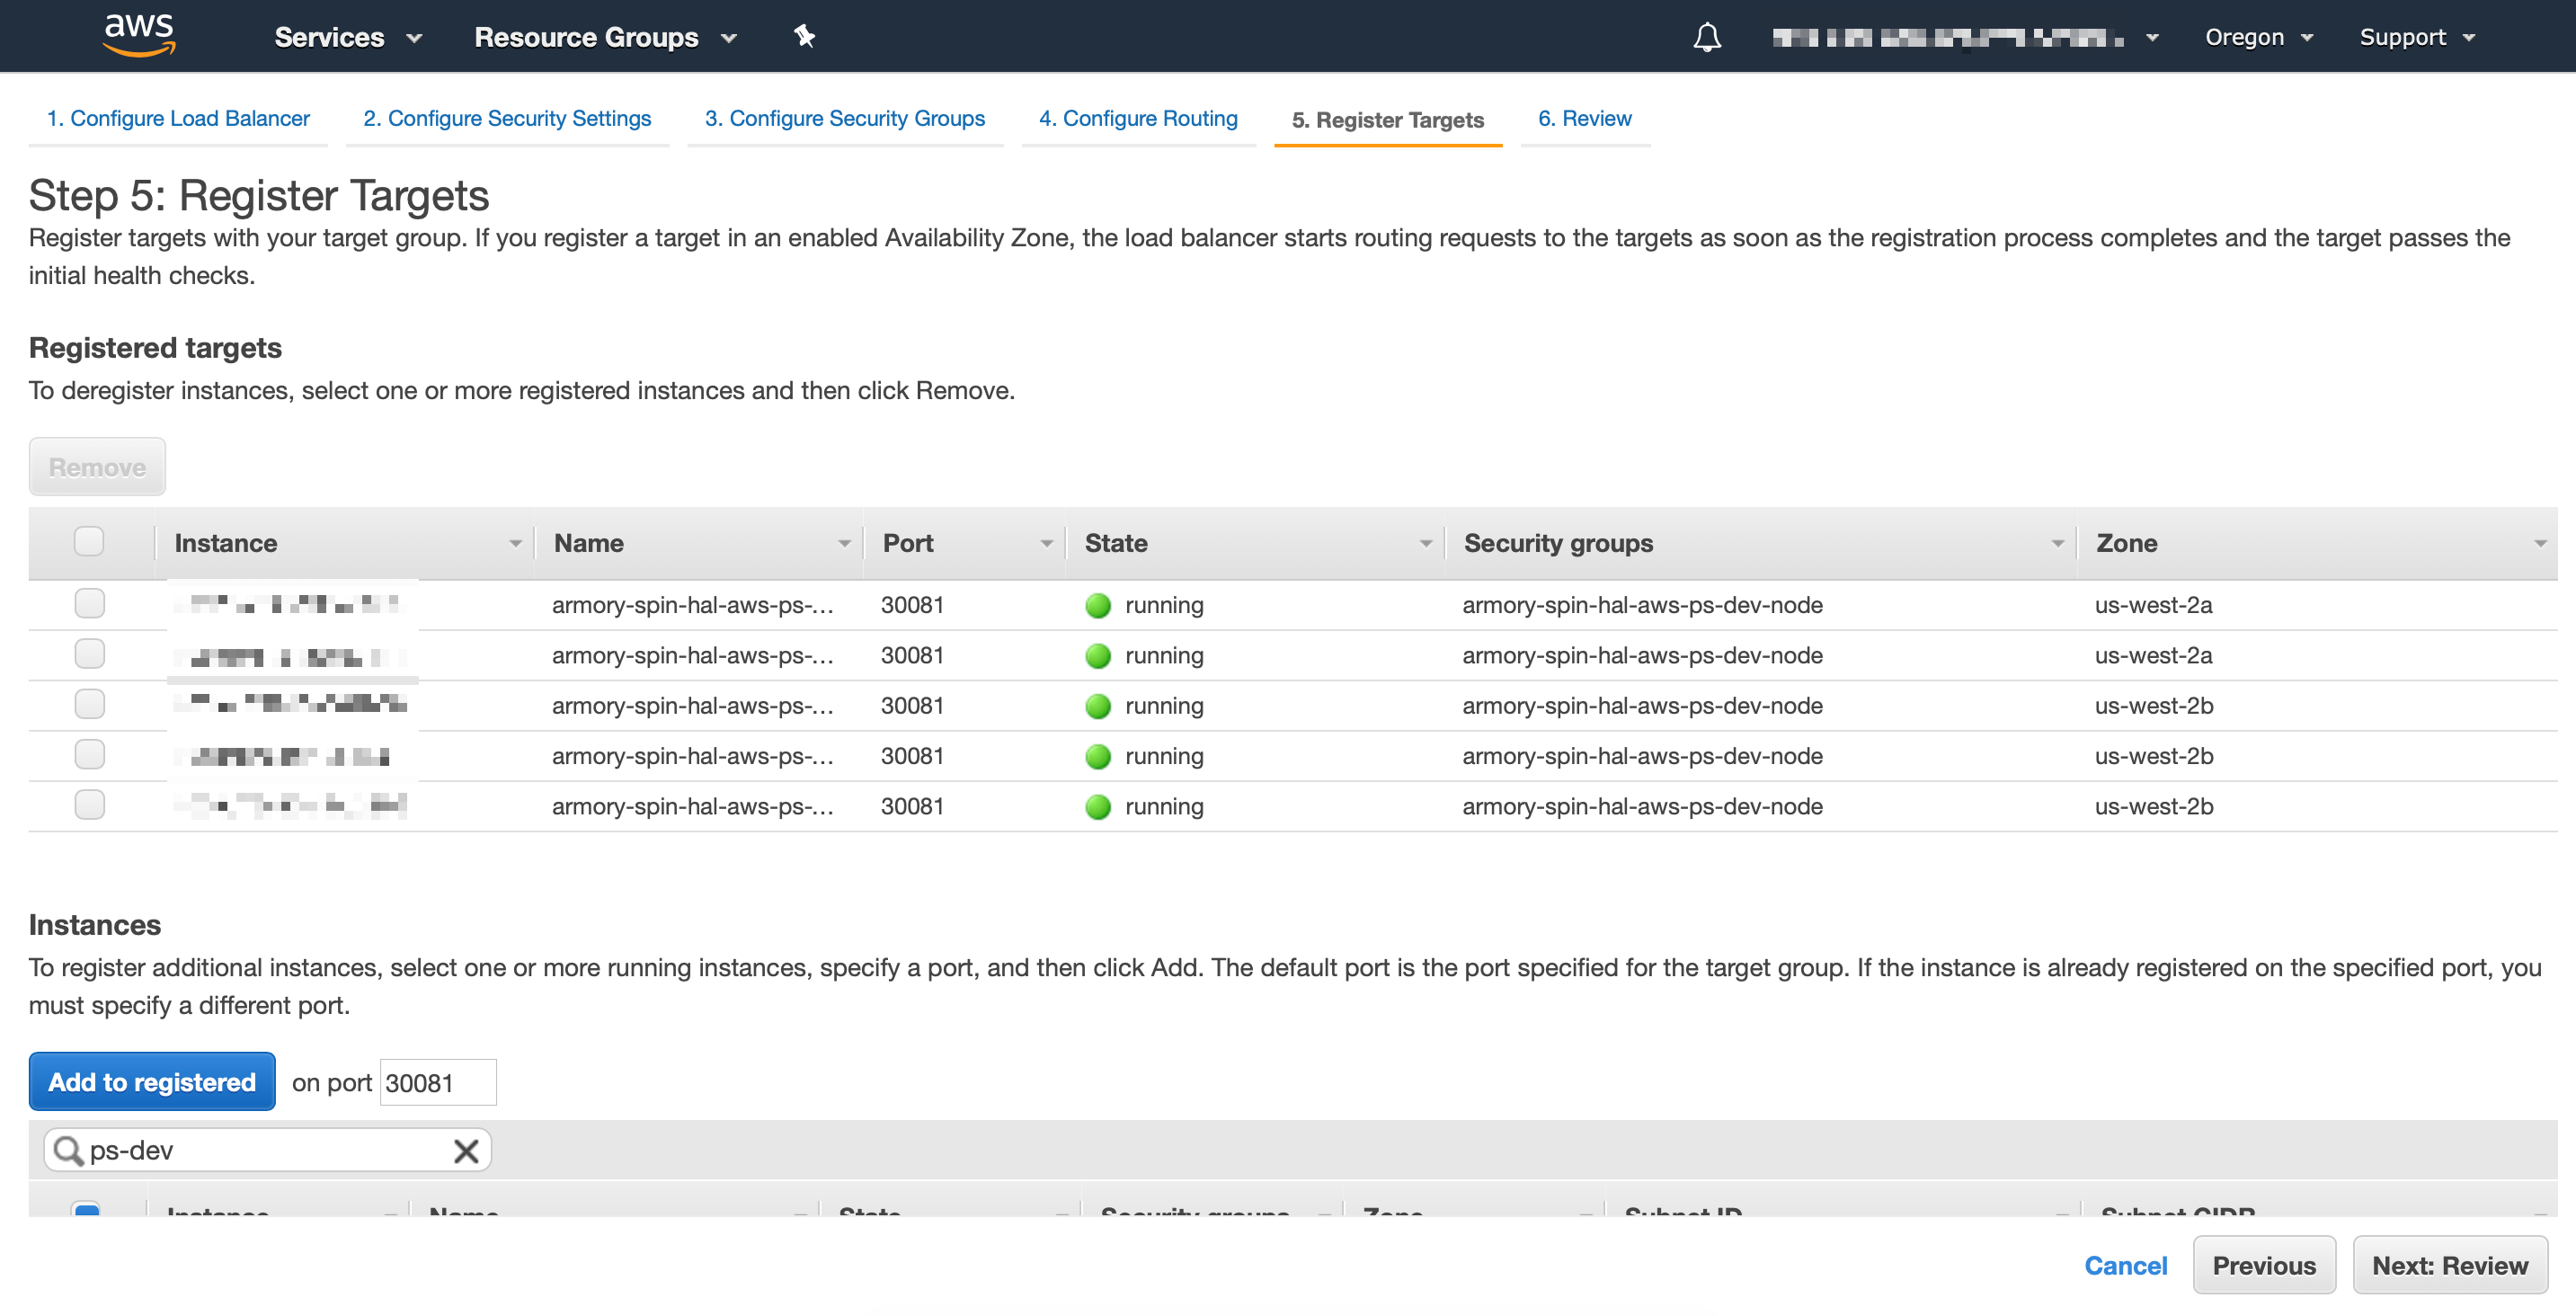
If for some reason you get Unhealthy status in the target group you created, make sure that EKS worker nodes security groups allow traffic to the target ports, at least from Load Balancer’s security groups.
Finally repeat the same steps for creating Gate Load balancer.
Step 3: Update Spinnaker configuration
Spinnaker needs to know which url’s are used to access it. After you have updated your DNS with the Load Balancers CNAME’s created in the previous step, the next step is to update Spinnaker configuration:
Operator
Update and apply the SpinnakerService manifest:
apiversion: spinnaker.io/v1alpha2
kind: SpinnakerService
metadata:
  name: spinnaker
spec:
  spinnakerConfig:
    config:
      security:
        apiSecurity:
          overrideBaseUrl: https://spinnaker-gate.armory.io  # Specify your DNS name for Gate with https scheme
        uiSecurity:
          overrideBaseUrl: https://spinnaker.armory.io       # Specify your DNS name for Deck with https scheme
          ...  # rest of config omitted for brevity
Assuming that Spinnaker is installed in spinnaker namespace:
kubectl -n spinnaker apply -f spinnakerservice.yml
Halyard
hal config security api edit --override-base-url https://${GATE_DNS_NAME}
hal config security ui edit --override-base-url https://${DECK_DNS_NAME}
hal deploy apply
Exposing Spinnaker on GKE with Ingress
Setting up HTTP Load Balancing with Ingress
GKE has a “built-in” ingress controller and that’s what we will use.
First create a file called basic-ingress.yaml and paste it the following
apiVersion: extensions/v1beta1
kind: Ingress
metadata:
  name: basic-ingress
spec:
  rules:
  - host: demo.armory.io
    http:
      paths:
      - backend:
          serviceName: spin-deck
          servicePort: 80  # Port 80 if using Operator, port 9000 if using Halyard
        path: /
  - host: gate.demo.armory.io
    http:
      paths:
      - backend:
          serviceName: spin-gate
          servicePort: 80  # Port 80 if using Operator, port 8084 if using Halyard
        path: /
Then apply this
kubectl apply -f basic-ingress.yaml
Find out the external IP address of the load balancer serving your application by running:
kubectl get ingress basic-ingress
Output:
NAME            HOSTS                                       ADDRESS         PORTS     AGE
basic-ingress   demo.armory.io, gate.demo.armory.io         203.0.113.12    80        2m
Note: It may take a few minutes for GKE to allocate an external IP address and set up forwarding rules until the load balancer is ready to serve your application. In the meanwhile, you may get errors such as HTTP 404 or HTTP 500 until the load balancer configuration is propagated across the globe.
You need to update your DNS records to have the demo.armory.io host point to the IP address generated.
Now tell Spinnaker about its external endpoints:
Operator
Update and apply the SpinnakerService manifest:
apiversion: spinnaker.io/v1alpha2
kind: SpinnakerService
metadata:
  name: spinnaker
spec:
  spinnakerConfig:
    config:
      security:
        apiSecurity:
          overrideBaseUrl: http://gate.demo.armory.io  # Specify your DNS name for Gate
        uiSecurity:
          overrideBaseUrl: http://demo.armory.io       # Specify your DNS name for Deck
          ...  # rest of config omitted for brevity
Assuming that Spinnaker is installed in spinnaker namespace:
kubectl -n spinnaker apply -f spinnakerservice.yml
Halyard
hal config security api edit --override-base-url https://gate.demo.armory.io
hal config security ui edit --override-base-url https://demo.armory.io
hal deploy apply
After doing that you can visit http://demo.armory.io/ to view spinnaker.
Secure with SSL on GKE
To enable SSL and configure your certificates you can follow this guide: https://cloud.google.com/kubernetes-engine/docs/how-to/ingress-multi-ssl
HTTP/HTTPS Redirects
You must enable HTTP/HTTPS redirects when your Spinnaker deployment fits the following description:
- TLS encryption for Deck (UI) and Gate (API) for Spinnaker
- A load balancer (service, ingress, etc.) in front of your Deck/Gate that terminates TLS and forwards communications to the Spinnaker microservices.
To enable redirects, complete the following steps:
Operator
Update the SpinnakerService manifest with the following:
apiversion: spinnaker.io/v1alpha2
kind: SpinnakerService
metadata:
  name: spinnaker
spec:
  spinnakerConfig:
    profiles:
      gate:
        server:
          tomcat:
            protocolHeader: X-Forwarded-Proto
            remoteIpHeader: X-Forwarded-For
            internalProxies: .*
            httpsServerPort: X-Forwarded-Port
            ...  # rest of config omitted for brevity
Assuming that Spinnaker is installed in spinnaker namespace:
kubectl -n spinnaker apply -f spinnakerservice.yml
Finally, clear your cache.
Halyard
Add the following entry to your .hal/<deployment-name>/profiles/gate-local.yml:
server:
  tomcat:
    protocolHeader: X-Forwarded-Proto
    remoteIpHeader: X-Forwarded-For
    internalProxies: .*
    httpsServerPort: X-Forwarded-Port
Next, run the following command: hal deploy apply.
Finally, clear your cache.
For an alternative solution, see the following Knowledge Base article: Troubleshooting http/https redirects with authentication.