Overview
The examples on this page describe how to configure the Terraform Integration and an artifact provider to support either GitHub or BitBucket. Note that the Terraform Integration also requires a git/repo artifact account. For information about how to use the stage, see Using the Terraform Integration.
Armory Spinnaker’s Terraform Integration integrates your infrastructure-as-code Terraform workflow into your SDLC. Armory’s Terraform Integration interacts with a source repository you specify to deploy your infrastructure as part of a Spinnaker pipeline.
- Supported Terraform versions
- Redis
- Requirements
- Configure the Git Repo artifact
- Configure the Terraform Integration for GitHub
- Configure the Terraform Integration for BitBucket
- Enabling the Terraform Integration UI
- Completing the installation
- Configure Terraform for your cloud provider
- Submit feedback
Supported Terraform versions
Armory ships several versions of Terraform as part of the Terraform Integration feature. The Terraform binaries are verified by checksum and with Hashicorp’s GPG key before being installed into an Armory release.
When creating a Terraform Integration stage, pipeline creators select a specific available version from a list of available versions:
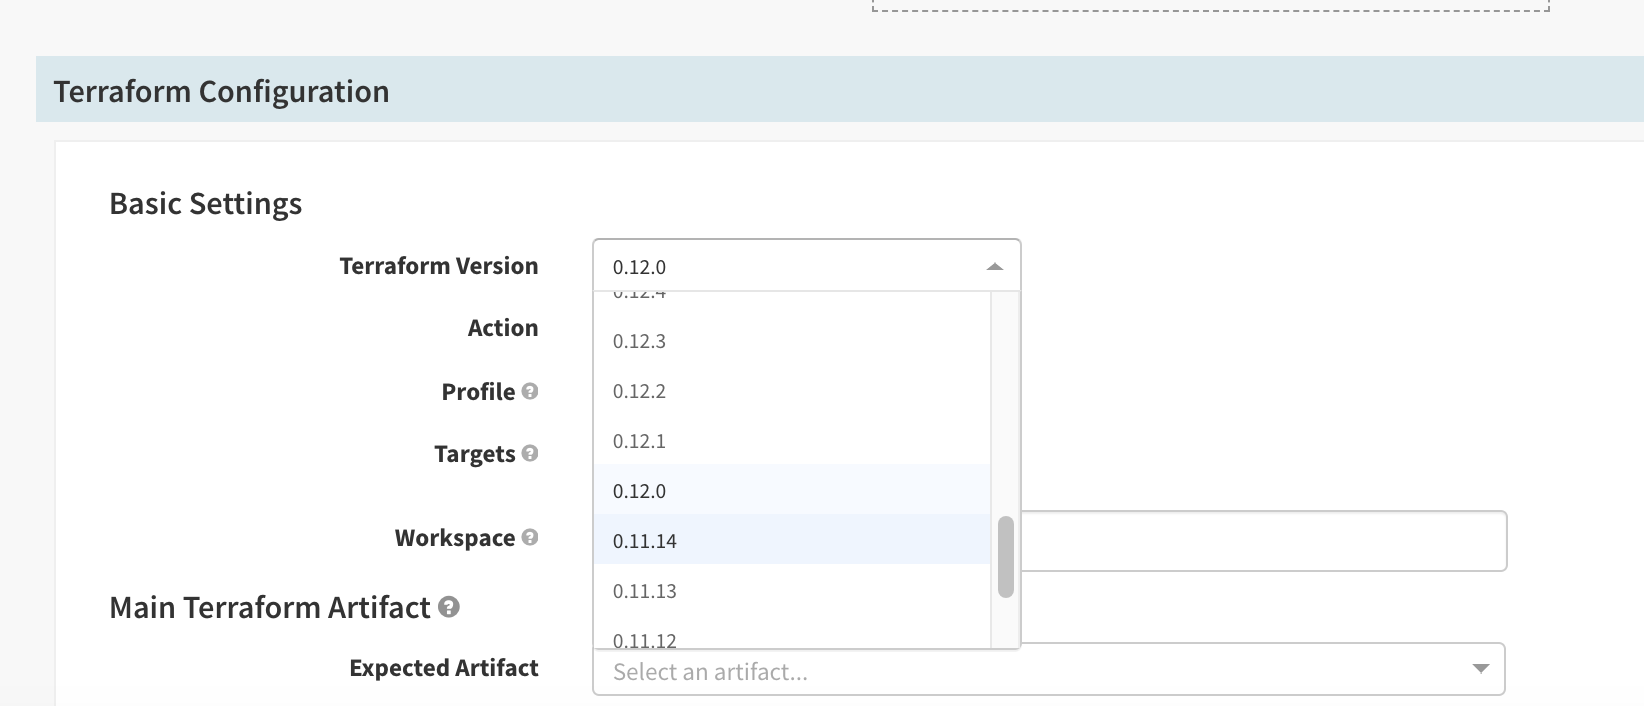
Note that all Terraform stages within a Pipeline that affect state must use the same Terraform version.
Redis
Terraformer uses Redis to store Terraform logs and plans. An external Redis instance is highly recommended for production use.
Note: Terraformer can only be configured to use a password with the default Redis user.
To set/override the Spinnaker Redis settings do the following:
Operator
In SpinnakerService manifest:
apiVersion: spinnaker.armory.io/v1alpha2
kind: SpinnakerService
metadata:
  name: spinnaker
spec:
  spinnakerConfig:
    profiles:
      terraformer:
        redis:
          baseUrl: "redis://spin-redis:6379"
          password: "password"
kubectl -n spinnaker apply -f spinnakerservice.yml
Halyard
Edit the ~/.hal/default/profiles/terraformer-local.yml file and add the following:
redis:
  baseUrl: "redis://spin-redis:6379"
  password: "password"
Then run hal deploy apply to deploy the changes.
Requirements
- Credentials (in the form of basic auth) for your Terraform Git repository. The Terraform Integration needs access to credentials to download directories that house your Terraform templates. The credentials can take one of two forms:
- If your Terraform repo is in GitHub, use a Personal Acccess Token (potentially associated with a service account) as the ‘token’. Generate this token in your GitHub settings. For more information, see Generating a Github Personal Access Token (PAT).
- If your Terraform repo is in BitBucket, use a username/password that has access to your BitBucket repo.
- To use Terraform Input Variable Files (
tfvar), you must have a separate artifact provider (such as the GitHub, BitBucket, or HTTP artifact provider) that can pull yourtfvarfile(s). Additionally, the credentials must be configured in both places: the Terraform Integration and the artifact provider.
Generating a GitHub Personal Access Token (PAT)
Skip this section if you are using BitBucket, which requires your username and password.
Before you start, you need a GitHub Personal Access Token (PAT). The Terraform Integration authenticates itself using the PAT to interact with your GitHub repositories. You must create and configure a PAT so that the Terraform Integration can pull a directory of Terraform Templates from GitHub. Additionally, the Spinnaker GitHub artifact provider require a PAT for tfvar files.
Make sure the PAT you create meets the following requirements:
- The token uses a distinct name and has the repo scope.
- If your GitHub organization uses Single Sign-On (SSO), enable
the SSO option for the organizations that host the Terraform template(s) and Terraform
tfvarfiles.
For more information about how to generate a GitHub PAT, see Creating a Personal Access Token for the Command Line.
Configure the Git Repo artifact
If you do not already have a git/repo artifact account configured, you must do so to use the Terraform Integration stage.
Operator
Edit the SpinnakerService manifest to add the following:
apiVersion: spinnaker.armory.io/v1alpha2
kind: SpinnakerService
metadata:
  name: spinnaker
spec:
  spinnakerConfig:
    profiles:
      clouddriver:
        artifacts:
          gitRepo:
            enabled: true
            accounts:
            - name: gitrepo
              token: <Your GitHub PAT> # GitHub personal access token
Halyard
Edit the ~/.hal/default/profiles/clouddriver-local.yml file and add the following:
artifacts:
  gitRepo:
    enabled: true
    accounts:
    - name: gitrepo
      token: <Your GitHub PAT> # GitHub personal access token
For more information, see Git Repo.
Configure the Terraform Integration for GitHub
These steps describe how to configure GitHub as an artifact provider for the Terraform Integration. For information about BitBucket, see Configuring the Terraform Integration with BitBucket.
1. Enabling and configuring the GitHub Artifact Provider
Spinnaker uses the Github Artifact Provider to download any referenced tfvar
files.
If you already have a GitHub artifact account configured in Spinnaker, skip this section.
Note: The following examples use github-for-terraform as a unique identifier for the artifact account. Replace it with your own identifier.
Operator
Edit the SpinnakerService manifest to add the following:
apiVersion: spinnaker.armory.io/v1alpha2
kind: SpinnakerService
metadata:
  name: spinnaker
spec:
  spinnakerConfig:
    config:
      artifacts:
        github:
          accounts:
          - name: github-for-terraform
            token: <Your GitHub PAT> # GitHub personal access token # PAT GitHub token. This field supports "encrypted" field references (https://docs.armory.io/spinnaker-install-admin-guides/secrets/)
          enabled: true
Halyard
-
Enable GitHub as an artifact provider:
hal config artifact github enable -
Add the GitHub account:
hal config artifact github account add github-for-terraform --tokenThe command prompts you for your GitHub PAT.
2. Enabling and configuring the Terraform Integration
Enable the Terraform Integration
Operator
In SpinnakerService manifest:
apiVersion: spinnaker.armory.io/v1alpha2
kind: SpinnakerService
metadata:
  name: spinnaker
spec:
  spinnakerConfig:
    config:
      armory:
        terraform:
          enabled: true
          git:
            enabled: true
            accessToken: <Your GitHub PAT>  # PAT GitHub token. This field supports "encrypted" field references (https://docs.armory.io/spinnaker-install-admin-guides/secrets/)
Halyard
hal armory terraform enable

# This will prompt for the token
hal armory terraform edit \
--git-enabled \
--git-access-token
Next, go to Enabling the Terraform UI if you are using an Armory Spinnaker version before 2.17.3. Otherwise, go to Completing the installation.
Configure the Terraform Integration for BitBucket
1. Enabling and configuring the BitBucket Artifact Provider
Spinnaker uses the BitBucket Artifact Provider to download any referenced tfvar
files, so it must be configured with the BitBucket token to pull these files.
If you already have a BitBucket artifact account configured in Spinnaker, skip this step.
Replace bitbucket-for-terraform with any unique identifier to
identify the artifact account.
Operator
apiVersion: spinnaker.armory.io/v1alpha2
kind: SpinnakerService
metadata:
  name: spinnaker
spec:
  spinnakerConfig:
    config:
      artifacts:
        bitbucket:
          enabled: true
          accounts:
          - name: bitbucket-for-terraform
            username: <Your Bitbucket username>
            password: <Your Bitbucket password> # This field supports "encrypted" field references (https://docs.armory.io/spinnaker-install-admin-guides/secrets/)
Halyard
hal config artifact bitbucket enable

# This will prompt for the password
hal config artifact bitbucket account add bitbucket-for-terraform \
  --username <USERNAME> \
  --password
2. Enabling and configuring the Terraform integration with a BitBucket token
The Terraform Integration also needs access to the BitBucket token to download full Github directories hosting your Terraform templates.
Operator
In SpinnakerService manifest:
apiVersion: spinnaker.armory.io/v1alpha2
kind: SpinnakerService
metadata:
  name: spinnaker
spec:
  spinnakerConfig:
    config:
      armory:
        terraform:
          enabled: true
          git:
            enabled: true
            username: my-user # BitBucket user name.
            accessToken: abc  # BitBucket password. This field supports "encrypted" field references (https://docs.armory.io/spinnaker-install-admin-guides/secrets/)
Halyard
# This will prompt for the token, which is your BitBucket password
hal armory terraform edit \
  --git-enabled \
  --git-username <USERNAME> \
  --git-access-token
Next, go to Enabling the Terraform UI if you are using an Armory Spinnaker version before 2.17.3. Otherwise, go to Completing the installation.
Enabling the Terraform Integration UI
If you previously used the Terraform Integration stage by editing the JSON representation of the stage, those stages are automatically converted to use the UI.
For Armory Spinnaker 2.17.3 and later, the UI is on by default. If you are using an earlier version, manually enable the stage UI for Deck:
Operator
Edit the SpinnakerService manifest to add the following:
apiVersion: spinnaker.armory.io/v1alpha2
kind: SpinnakerService
metadata:
  name: spinnaker
spec:
  spinnakerConfig:
    profiles:
      deck:
        settings-local.js: |
          window.spinnakerSettings.feature.terraform = true;
Halyard
Edit ~/.hal/default/profiles/settings-local.js and add the following:
window.spinnakerSettings.feature.terraform = true;
Completing the installation
After you finish your Terraform integration configuration, perform the following steps:
-
Apply the changes:
Operator
Assuming that Spinnaker lives in the namespace
spinnakerand theSpinnakerServicemanifest is namedspinnakerservice.yml:kubectl -n spinnaker apply -f spinnakerservice.ymlHalyard
hal deploy apply -
Confirm that the Terraform Integration service (Terraformer) is deployed with your Spinnaker deployment:
kubectl get pods -n <your-spinnaker-namespace>In the command output, look for a line similar to the following:
spin-terraformer-d4334g795-sv4vz 2/2 Running 0 0d
Configure Terraform for your cloud provider
Since the Terraform Integration executes all Terraform commands against the terraform binary, all methods of configuring authentication are supported for your desired cloud provider. This section describes how to accomplish this for various cloud providers.
Configuring for AWS and Git private repositories
There are several ways to enable Terraform to authenticate with AWS. You can find the full list here. Each of these methods is supported; however, you may need to do additional configuration to enable them.
The following example describes how to provide access to AWS and a remote private repo using an init container that holds secrets. AWS access gives Spinnaker the ability to stand up infrastructure for you in AWS. If your Terraform scripts rely on modules stored in a private remote repository, Spinnaker also needs access to those. The workflow below assumes you are using SSH in order to clone a remote repository. A similar workflow exists for relying on HTTP/HTTPS.
Before you start though, make sure you have access to the following for your AWS account:
- AWS access key
- AWS secret key
- SSH private key for the Git private repository
Additionally, you need kubectl installed. Perform the following steps:
-
Create a file named
aws-credentialswith the following contents:[default] aws_access_key_id = <Your AWS access key id> aws_secret_access_key = <Your AWS secret key> - Create a directory named
ssh. -
In the
sshdirectory, create a file namedid_rsawith your SSH private key:<Add your SSHA private key> -
In the
sshdirectory, create a file namedconfigwith the following contents:StrictHostKeyChecking no -
Run the following command to create a generic Kubernetes secret named
spin-terraformer-secrets:kubectl create secret generic spin-terraformer-secrets -n <Spinnaker namespace> --from-file=credentials=aws-credentials --from-file=id_rsa=ssh/id_rsa --from-file=config=ssh/configReplace
<Spinnaker namespace>with the namespace where Spinnaker is deployed. The command returns the following:secret/spin-terraformer-secrets created -
Edit Terraformer service settings:
Operator
apiVersion: spinnaker.armory.io/v1alpha2
kind: SpinnakerService
metadata:
  name: spinnaker
spec:
  spinnakerConfig:
    service-settings:
      terraformer:
        kubernetes:
          securityContext:
            runAsUser: 1000
            runAsGroup: 1000
            fsGroup: 1000
          volumes:
          - id: spin-terraformer-secrets
            type: secret
            defaultMode: 420
            mountPath: /secrets
          - id: ssh-key-temp
            type: emptyDir
            mountPath: /home/spinnaker/.ssh
          - id: aws-creds-temp
            type: emptyDir
            mountPath: /home/spinnaker/.aws
Halyard
In the
~/.hal/default/service-settings/terraformer.ymlfile, add the following:kubernetes: securityContext: runAsUser: 1000 # Spinnaker uses UID and GID 1000 runAsGroup: 1000 fsGroup: 1000 volumes: - id: spin-terraformer-secrets # The secret name should match the name used to create the Kubernetes secret type: secret defaultMode: 420 mountPath: /secrets - id: ssh-key-temp type: emptyDir mountPath: /home/spinnaker/.ssh - id: aws-creds-temp type: emptyDir mountPath: /home/spinnaker/.aws -
Edit
initContainerin the config:Operator
apiVersion: spinnaker.armory.io/v1alpha2
kind: SpinnakerService
metadata:
  name: spinnaker
spec:
  spinnakerConfig:
    config:
      deploymentEnvironment:
        initContainers:
          spin-terraformer:
          - name: init-terraformer
            image: busybox:latest
            command:
            - sh
            - -c
            - cp /secrets/* /ssh-spin && chown -R 1000:1000 /ssh-spin/* && chmod 600 /ssh-spin/* && mv /ssh-spin/credentials /aws-spin/
            volumeMounts:
            - mountPath: /ssh-spin
              name: ssh-key-temp
            - mountPath: /aws-spin
              name: aws-creds-temp
            - mountPath: /secrets
              name: spin-terraformer-secrets
Halyard
In the file
~/.hal/configand add the following to theinitContainersection:... initContainers: spin-terraformer: - name: init-terraformer image: busybox:latest command: ["sh", "-c", "cp /secrets/* /ssh-spin && chown -R 1000:1000 /ssh-spin/* && chmod 600 /ssh-spin/* && mv /ssh-spin/credentials /aws-spin"] volumeMounts: - mountPath: /ssh-spin name: ssh-key-temp - mountPath: /aws-spin name: aws-creds-temp - mountPath: /secrets name: spin-terraformer-secrets # The secret name should match the name used to create the Kubernetes secret ...This section creates an init container for Terraformer to use that contains the necessary secrets for AWS, sets the UID and GID to 1000 (which Spinnaker uses), and moves the files to directories that are accessible to Spinnaker.
-
Apply your changes to your Spinnaker deployment:
hal deploy apply -
Verify the following before you start using the Terraform integration:
Verify that the Terraformer pod is running:
kubectl -n <Your Spinnaker namespace> get podsVerify the credentials are available:
# Enter the Terraformer pod
kubectl -n <Your Spinnaker namespace> exec -it <Terraformer pod name> bash

# Verify the .ssh directory contains your SSH private key file
ls -l /home/spinnaker/.ssh
# Verify the .aws directory contains your AWS credential file
ls -l /home/spinnaker/.aws
The Terraform Integration now has access to clone private remote Git repositories via SSH and create AWS objects after you make these changes and the Terraform Integration redeploys.
Submit feedback
Let us know what you think at go.armory.io/ideas or feedback.armory.io. We’re constantly iterating on customer feedback to ensure that the features we build make your life easier!