Armory’s Pipelines As Code feature provides a way to specify pipeline definitions in source code repos (like GitHub & BitBucket).
The Armory Spinnaker installation provides a service called “Dinghy” which will keep the pipeline in Spinnaker in sync with what is defined in the GitHub repo. Also, users will be able to make a pipeline by composing other pipelines, stages, or tasks and templating certain values.
NOTE: before you can use this feature, please ensure you have configured it correctly.
- How it works in a nutshell
- Primitives
- Template variables and substitution
- Multiple level inheritance:
- Deleting stale pipelines
- Triggering other pipelines from within a stage
- Advanced features:
How it works in a nutshell
GitHub (or BitBucket) webhooks are sent off when either the Templates or the Module definitions are modified. The Dinghy service looks for and fetches all dependent modules and parses the template and updates the pipelines in Spinnaker. The pipelines get automatically updated whenever a module that is used by a pipeline is updated in VCS. This is done by maintaining a dependency graph. Dinghy will look for dinghyfiles in all directories not just the root path. Unless otherwise configured, Dinghy will process changes found in the master branch. For more information on how to configure branches, see Custom branch configuration
Primitives
- Modules: These are templates that define a Stage/Task in the pipeline. They are kept in a single GitHub repo that is configurable when the dinghy service starts. eg:

They are JSON files with replacable values in them. e.g., a module that defines a wait stage in a pipeline might look like:
{
    "name": "Wait",
    "refId": "1",
    "requisiteStageRefIds": [],
    "type": "wait",
    "waitTime": 42
}
- Pipeline definitions: These define a pipeline for an application in a file called
dinghyfile. Thedinghyfileusually resides at the root level of the application repo. eg:
You can compose stage/task templates to make a full definition. e.g., a Pipeline definition that has a single wait stage might look like:
{
  "application": "yourspinnakerapplicationname",
  "pipelines": [
    {
      "application": "yourspinnakerapplicationname",
      "keepWaitingPipelines": false,
      "limitConcurrent": true,
      "name": "Made By Armory Pipeline Templates",
      "stages": [
        {
          "name": "Wait",
          "refId": "1",
          "requisiteStageRefIds": [],
          "type": "wait",
          "waitTime": 10
        }
      ],
      "triggers": []
    }
  ]
}
Template variables and substitution
Pipeline definitions can include Modules defined in another GitHub Repo. e.g.:
{
  "application": "yourspinnakerapplicationname",
  "pipelines": [
    {
      "application": "yourspinnakerapplicationname",
      "keepWaitingPipelines": false,
      "limitConcurrent": true,
      "name": "Made By Armory Pipeline Templates",
      "stages": [
        {{ module "wait.stage.module" }} // Module created in dinghy-templates repo
      ],
      "triggers": []
    }
  ]
}
The {{ module "wait.stage.module" }} takes the wait.stage.module file inside the dinghy-templates repo, and includes it in the current template.
We can also pass variables to our modules like so:
{
  "application": "yourspinnakerapplicationname",
  "pipelines": [
    {
      "application": "yourspinnakerapplicationname",
      "keepWaitingPipelines": false,
      "limitConcurrent": true,
      "name": "Made By Armory Pipeline Templates",
      "stages": [
        {{ module "wait.stage.module" "waitTime" 200 }} // Pass the "waitTime" variable with value 200 to wait.stage.module
      ],
      "triggers": []
    }
  ]
}
Any number of variables can be passed to a module by simply specifying them as arguments, e.g.: {{ module "wait.stage.module" "waitTime" 100 "name" "simpleWait" }}.
Inside wait.stage.module, we can then include these variables inline:
{
  "waitTime": {{ var "waitTime" ?: 10 }}
  "name": "{{ var "name" ?: "defaultname" }}",
}
The {{ var }} function is used to access variables passed to the {{ module }} call.
The first parameter is the variable name: {{ var "waitName" }}
Optionally, you can include a default parameter: {{ var "waitName" ?: "defaultValue" }}.
Let us create a more realistic pipeline using templates. One that would look like this:
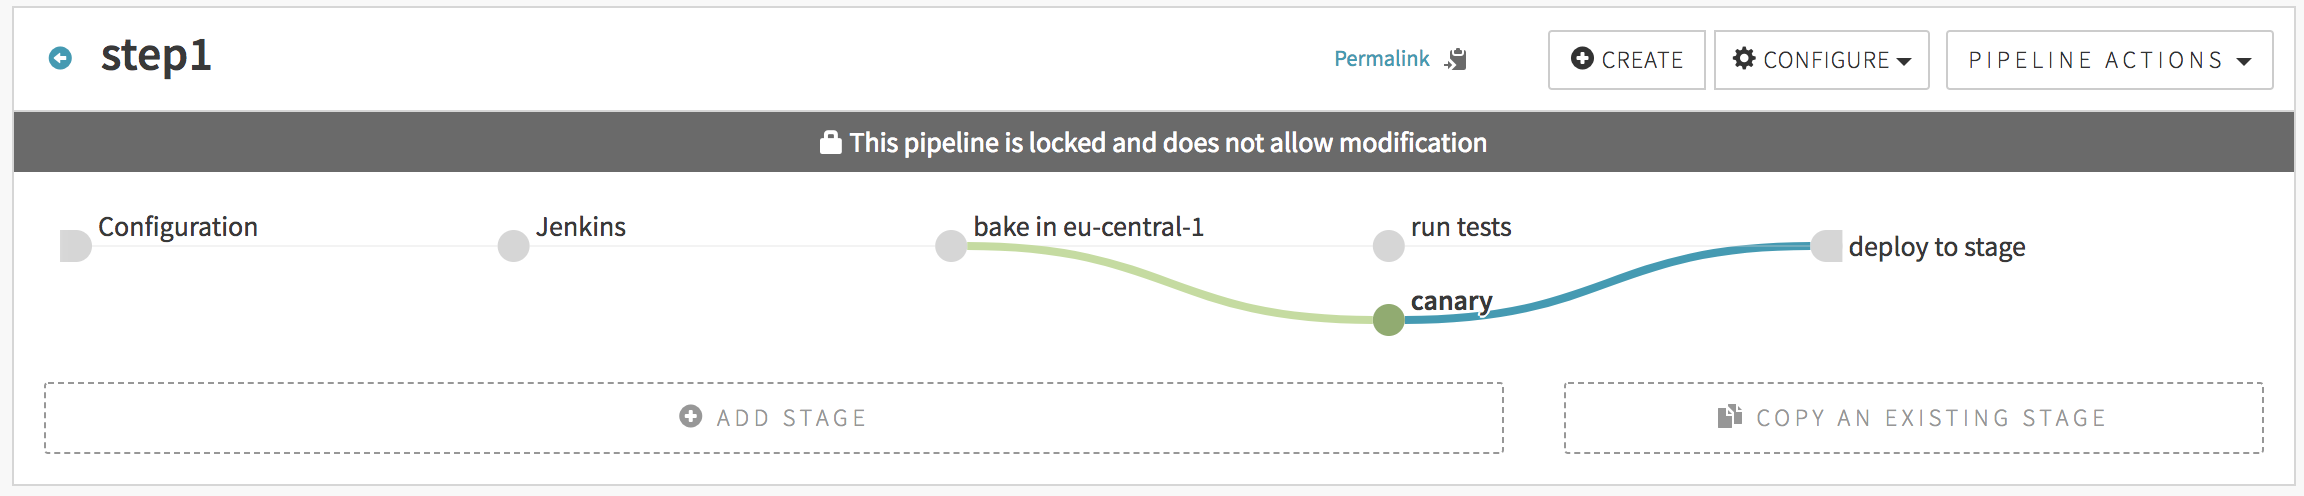
You would use the following JSON to create such. Note that any of the stages could have come from an imported module, but we show the full JSON here for readability:
{
  "application": "yourspinnakerapplicationname",
  "pipelines": [
    {
      "application": "yourspinnakerapplicationname",
      "keepWaitingPipelines": false,
      "limitConcurrent": true,
      "name": "step1",
      "stages": [
        {
          "continuePipeline": false,
          "failPipeline": true,
          "isNew": true,
          "job": "armory/job/armory-hello-deploy/job/master",
          "master": "Armory Jenkins",
          "name": "Jenkins",
          "parameters": {},
          "refId": "105",            // a unique id that's unique between pipelines.stages[*].refId
          "requisiteStageRefIds": [],
          "type": "jenkins"
        },
        {
          "baseLabel": "release",
          "baseOs": "ubuntu",
          "cloudProviderType": "aws",
          "extendedAttributes": {},
          "isNew": true,
          "name": "bake in eu-central-1",
          "package": "myapp_1.27-h343",
          "refId": "101",
          "regions": [
             "eu-central-1"
          ],
          "requisiteStageRefIds": [
            "105"      // this means: stage "105" comes before this stage
          ],
          "storeType": "ebs",
          "type": "bake",
          "user": "LeSandeep",
          "vmType": "hvm"
        },
        {
          "failPipeline": true,
          "isNew": true,
          "name": "run tests",
          "refId": "102",
          "requisiteStageRefIds": [
            "101"
          ],
          "type": "script",
          "user": "LeSandeep",
          "waitForCompletion": true
        },
        {
          "isNew": true,
          "name": "canary",
          "refId": "103",
          "requisiteStageRefIds": [
            "101"
          ]
        },
        {{ module deploy.stage.module "requisiteStageRefIds" ["102", "103"] }}
      ],
      "triggers": []
    }
  ]
}
The file deploy.stage.module would look like this:
{
  "clusters": [],
  "isNew": true,
  "name": "deploy to stage",
  "refId": "104",
  "requisiteStageRefIds": {{ var "requisiteStageRefIds" ?: [] }},
  "type": "deploy"
}
Multiple level inheritance:
In the below example, we show a pipeline that is created with multiple levels of module inheritance. The application’s dinghyfile looks like this:
{
  "application": "dinghytest",
  "pipelines": [
    {{ module "simple.pipeline.module" "application" "dinghytest" }}
  ]
}
The dinghyfile inherits its pipeline from a module named simple.pipeline.module that looks as shown below. Note that it also overrides the application name in the module to avoid conflict.
It is worth noting in the below example, where we are substituting a string variable, the call to {{ var … }} is also surrounded by quotes, unlike when substituting non-string variables (ie, int, array, json…)
{
  "application": "{{ var "application" ?: "yourspinnakerapplicationname" }}",
  "keepWaitingPipelines": false,
  "limitConcurrent": true,
  "name": "Made By Armory Pipeline Templates",
  "stages": [
    {{ module "wait.stage.module" "waitTime" 200 }},
    {{ module "deploy.stage.module" "requisiteStageRefIds" ["1"] }}
  ],
  "triggers": []
}
This module inherits two stages and overrides variables within them. The wait.stage.module is same as the one shown above. The deploy.stage.module looks like this:
{
  "clusters": [],
  "isNew": true,
  "name": "deploy to stage",
  "refId": "104",
  "requisiteStageRefIds": {{ var "requisiteStageRefIds" ?: [] }},
  "type": "deploy"
}
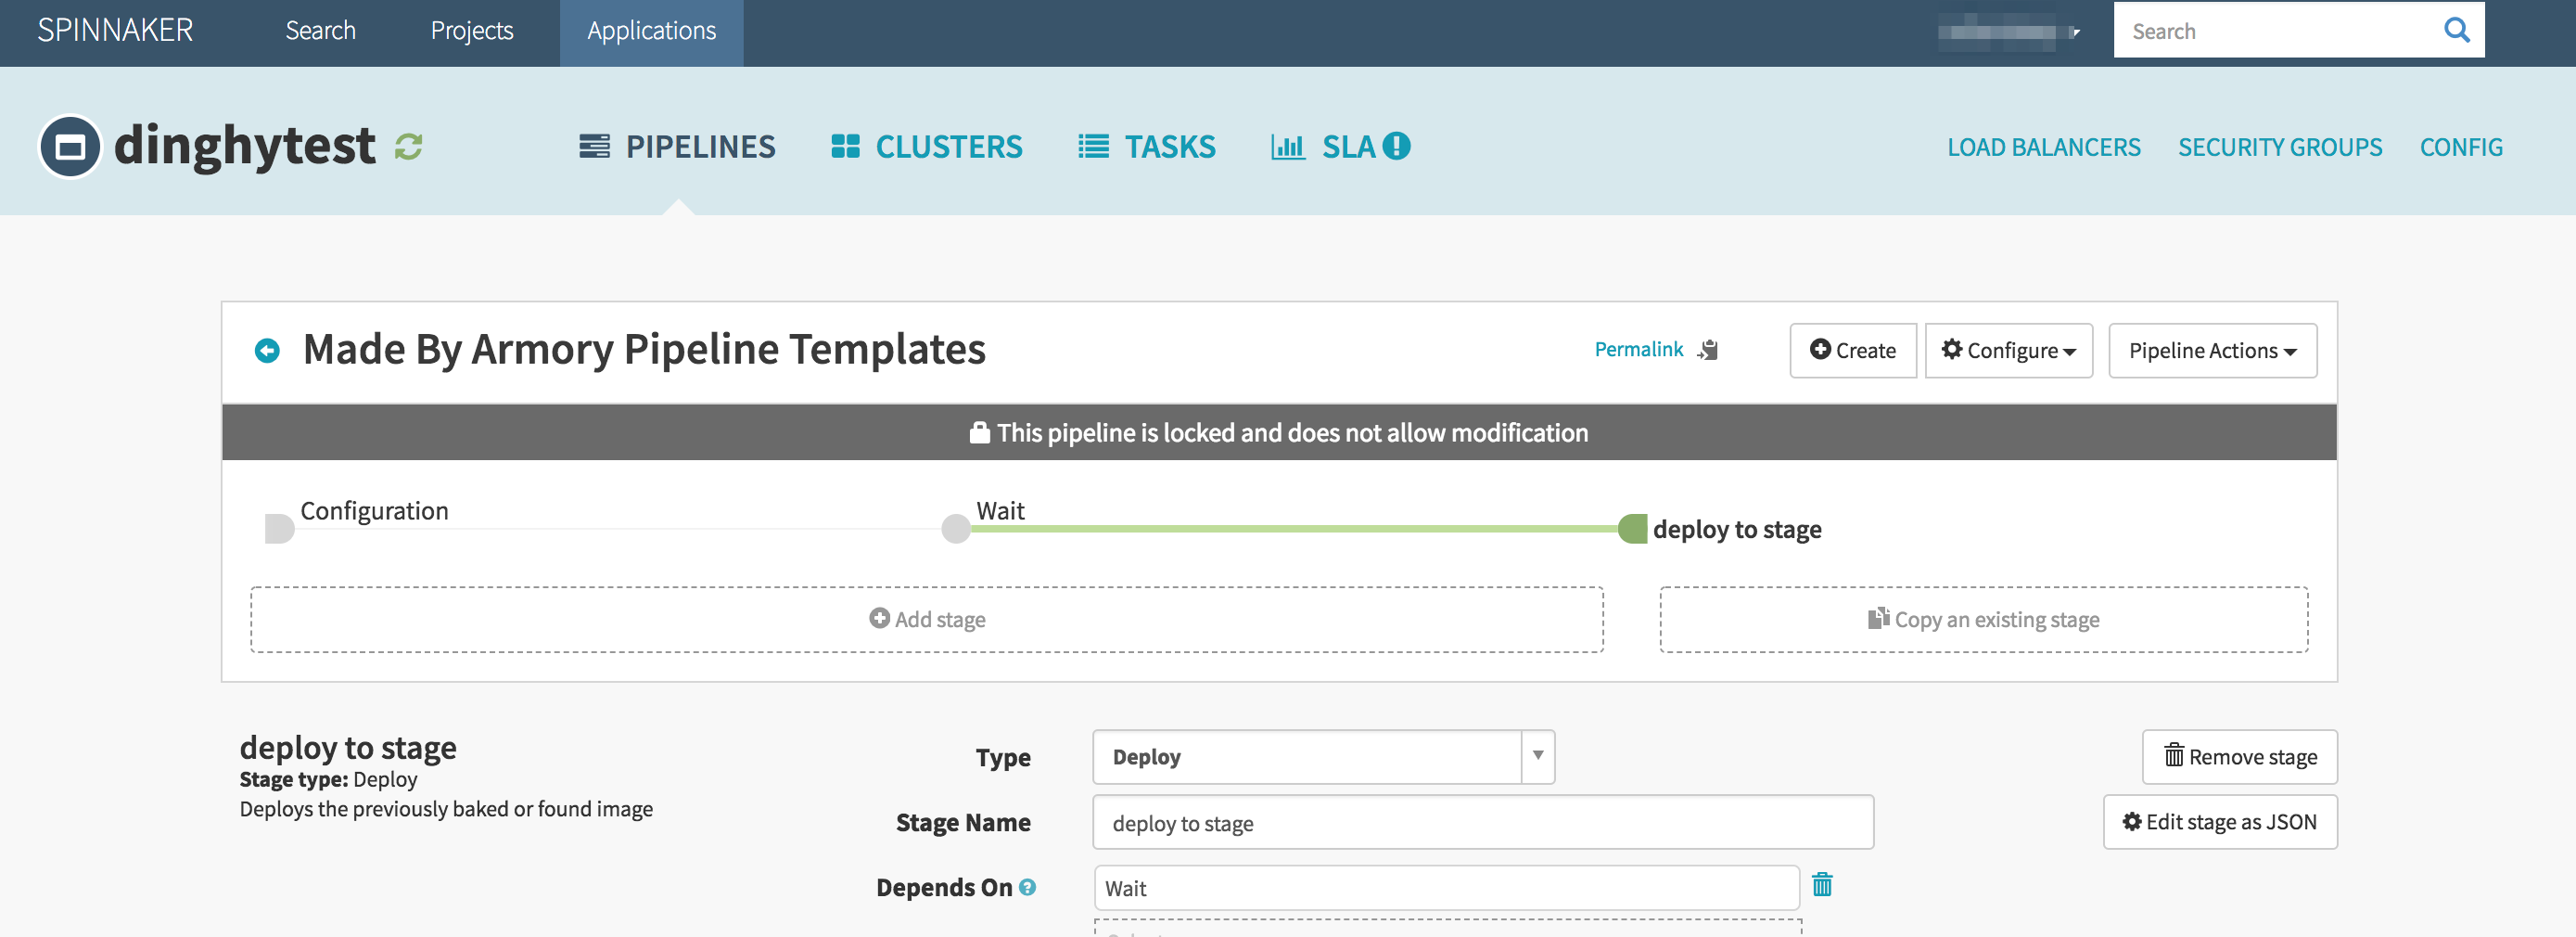
Note how the requisiteStageRefIds is overwritten while calling the module so that the deploy stage depends on the wait stage. This pipeline would look like this in the spinnaker UI:
Deleting stale pipelines
If you want any pipelines in the spinnaker application that are not part of the dinghyfile to be deleted automatically when the dinghyfile is updated, then you can set deleteStalePipelines to true in the JSON like so:
{
  "application": "yourspinnakerapplicationname",
  "deleteStalePipelines": true
  "pipelines": [
  ]
}
Triggering other pipelines from within a stage
The spinnaker pipeline stage allows you to trigger other pipelines. However, typically you need the UUID of the pipeline to be triggered. To make it easier to write dinghy templates, we have a pipelineID function which can be used in dinghyfiles to trigger pipelines. Consider the below example (pipeline.stage.module):
{
		"application": "pipelineidexample",
		"failPipeline": true,
		"name": "Pipeline",
		"pipeline": "{{ pipelineID "default-app" "default-pipeline" }}",
		"refId": "1",
		"requisiteStageRefIds": [],
		"type": "pipeline",
		"waitForCompletion": true
}
In the above example, we are triggering a pipeline by the name default-pipeline under default-app spinnaker application. The app name and the pipeline name can be overwritten when calling this module. At any higher level, simply pass in "triggerApp" and "triggerPipeline" like so: {{ module "pipeline.stage.module" "triggerApp" "pipelineidtest" "triggerPipeline" "testpipelinename" }}
Advanced features:
Monorepo
Dinghy supports multiple spinnaker applications under the same git repo. eg:
monorepo/
├── app1
│   ├── bin
│   ├── lib
│   ├── pkg
│   └── src
│       ├── app1.go
│       └── dinghyfile
└── app2
    ├── bin
    ├── lib
    ├── pkg
    └── src
        ├── app2.go
        └── dinghyfile
Notice both app1 and app2 are under the same repo, each app has its own dinghyfile and its own spinnaker application that can be referenced in the dinghyfile.
Template validation
If, while rendering a dinghyfile, a malformed JSON file is encountered, the logs should indicate the line number and the column number of the error. The arm cli can be used to validate dinghyfiles and modules locally without having to put them in source control.
Newlines
For ease of readablilty, you can split a single call to module across multiple lines. For example, the following two dinghyfiles are both valid & produce identical pipelines in spinnaker:
{
  "application": "yourspinnakerapplicationname",
  "pipelines": [
    {
      "application": "yourspinnakerapplicationname",
      "name": "Made By Armory Pipeline Templates",
      "stages": [
        {{ module "wait.stage.module" "name" "wait-for-cache-warm-up" "waitTime" 42 }}
      ]
    }
  ]
}
{
  "application": "yourspinnakerapplicationname",
  "pipelines": [
    {
      "application": "yourspinnakerapplicationname",
      "name": "Made By Armory Pipeline Templates",
      "stages": [
        {{
           module "wait.stage.module"
           "name" "wait-for-cache-warm-up"
           "waitTime" 42
        }}
      ]
    }
  ]
}
Top-level variables in dinghyfiles
When passing in variables to modules, you have the option of defining variables at the top-level dinghyfile like so:
{
  "application": "yourspinnakerapplicationname",
  "globals": {
      "waitTime": "42",
      "name": "default-name"
  },
  "pipelines": [
    {
      "application": "yourspinnakerapplicationname",
      "name": "Made By Armory Pipeline Templates",
      "stages": [
        {{ module "wait.stage.module" }}
      ]
    }
  ]
}
In the above example, the variables waitTime and name (used inside wait.stage.module) are defined at the top level, and not explicitly defined when the call to wait.stage.module is made.
Note that top-level variables are overwritten by variables in the call to module if both are present. For instance, in the below example, the waitTime after the dinghyfile is rendered would be 43:
{
  "application": "yourspinnakerapplicationname",
  "globals": {
      "waitTime": "42",
      "name": "default-name"
  },
  "pipelines": [
    {
      "application": "yourspinnakerapplicationname",
      "name": "Made By Armory Pipeline Templates",
      "stages": [
        {{ module "wait.stage.module" "waitTime": "43" }}
      ]
    }
  ]
}
Nested variables
Another neat little trick with variables is support for nested variables. Consider the following variable usage in a module:
"name": "{{ var "name" ?: "some-name" }}"
Here, if the variable "name" was passed in, or is a top-level variable in the dinghyfile, then use that value, or else default to some-name.
With nested variables, instead of using a hardcoded default value, the default can from another variable. eg:
"name": "{{ var "name" ?: "@different_var" }}"
Here, if the variable "name" was not passed into the module call and is not a top-level variable in the dinghyfile, its value will come from a variable called "different_var" that is either a top-level variable or another variable passed in when the module is called. Note the @ syntax for the nested variable. The @ symbol is only used where the variable is used, not when it is passed in.
le